Screencasting is an integral part of my flipped classroom as I can record videos for a variety of purposes that include (but certainly not limited to) informing parents and students about class expectations, providing answer key videos, documenting directions and the steps of a project, and informing support staff of technical glitches, but I recognize that I am not a Hollywood cinematographer. So, the screencasting tool I choose depends on the type and length of video I need to create.
Screencastify
Screencastify is a Chrome extension that I use for quick recording of videos that are saved to my Google Drive or uploaded to YouTube. As editing capabilites are limited in the free version, I record quick, raw videos on the fly with Screencastify. If I need to quickly record the steps for using a specific edtech tool or need to record a quick video documenting a technical glitch, I will use Screencastify and share the Google Drive link to the video in an email, Edmodo post, or support help ticket. While I can upload Screencastify videos to YouTube, it is quicker and easier to just send the videos to Drive for fast distribution.
For screencasting with students who use G Suite for Education and for schools that block YouTube, Screencastify is the easiest edtech tool for students to use to create their own screencasts as the video can remain in the walled garden space of Google Drive and shared with those who need access. Videos can be embedded in Google Slides or the links turned in to assignments for quick assessments.
Screencast-O-matic
I love Screencast-O-matic for making longer demonstrations or informational videos that are under 15 minutes. To mitigate the need for post-production editing, I will have open on my desktop or browser all materials I plan on recording. Every video will begin with a title slide and a short introduction ("Hi, this is Mrs. Baker and today I will show you..."), and as I record, I will hit the pause button and switch tabs as needed. The video may conclude with a closing slide or a simple statement, "Thanks for watching! Please contact me if you have additional questions." Videos are uploaded to YouTube and later pulled into Edpuzzle, Actively Learn, or posted in Edmodo and Google Classroom.
Camtasia
If you are serious about video production and need advanced editing tools, then Camtasia is worth the $$$ investment, but be ware, videographers, that post-production editing can take up more time than the actual filming. There are some great flipping educators out there who can quickly whip up a screencast with cool transitions and special effects, but I haven't built up that level of proficiency with using Camtasia.
Interesting in Learning More?
Recognizing that we do not have Hollywood's budget nor the equipment to create a blockbuster screencast, I created this self-paced lesson embedded below which is modeled off of the Explore-Flip-Apply instructional method of Flipped Learning. Navigate through the slides, examine the examples provided, accesss the resources, and take a spin at creating your own. If you send me your creation, I'll add it to examples provided.
I integrate technology into my personal and professional practices so that I can save time and function efficiently. For many teachers, lesson planning can be time consuming and cumbersome as they write, execute, and send the plans to administration. Utilizing Google Calendar and a class Google Site as part of G Suite for Education, lesson planning can be quick and efficient. And, as everything is curated online, I do not need to print out reams of paper when submitting my plans to administration or keeping parents and students informed of events in class.
Quick Steps:
1. Create a calendar for each prep taught.
2. Create an all-day event for the lesson plan of the day.
3. In the description area of the event, type in the plan and links for the day.
4. Set the calendar to public and share with appropriate administrators.
5. Create a Google Site with pages for each prep taught and embed the calendars.
6. Share links to the Google Site as needed.
Calendar Organization & Settings
The longevity of Google Calendar makes it an ideal platform for paperless lesson planning. I have been writing my lesson plans in Google Calendar since September of 2013 and can easily access a specific day, month, or year with a few clicks. I do not organize and name my calendars by period as my schedule from year to year may differ. Nor do I need multiple calendars for the same level or prep, as I will have the same plan for each. Instead, I name and color code my calendars by the title or level of the class and use the same calendar every year I am teaching that prep. I can compare previous years' plans to the current school year, as well as copy/paste/edit descriptions of plans I reuse.
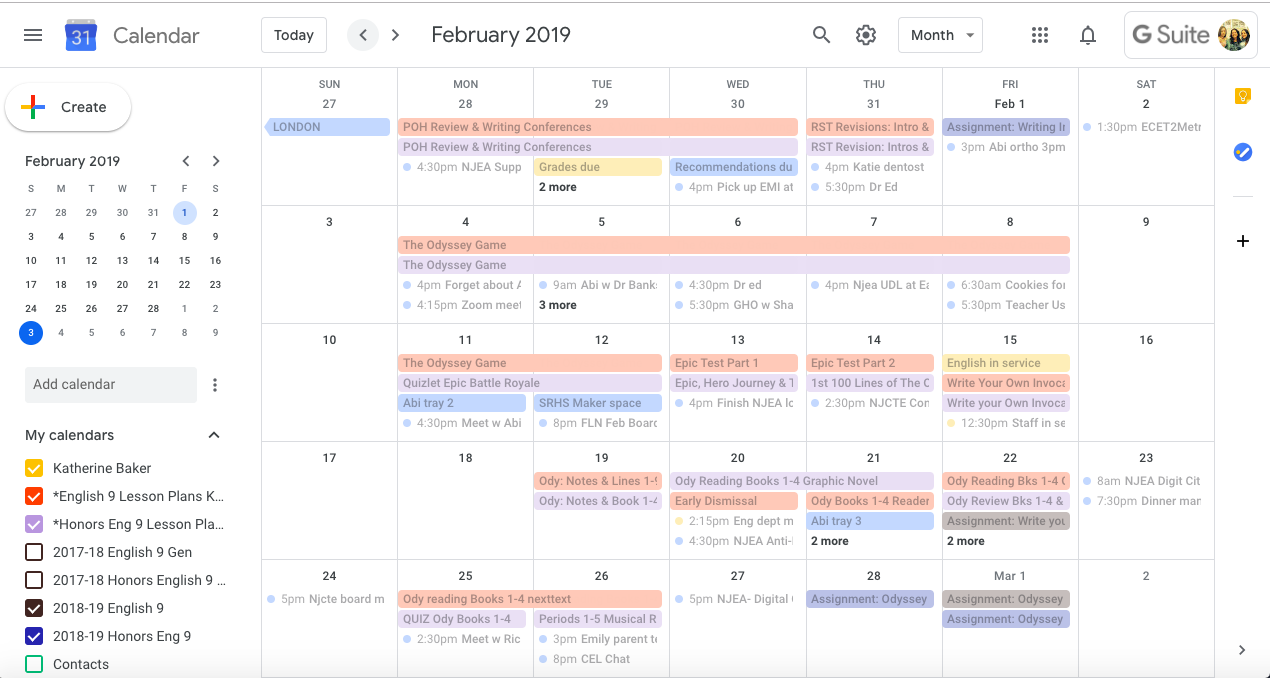
Here is a quick screenshot of my English 9 February 2018 and 2019 calendars. I can see that last year, I did not begin my Odyssey unit the end of the month, whereas this year, I am ahead of last year's pacing.
Writing the Plans
The day on which an event takes place is much more important the time it takes place. For each day I write plan, I create an all-day event. The time of event is irrelevant. I do not need my plans to be posted to a specific time because I am following the same teaching schedule every day, and it would be a waste of my time and energy to post the same plan for multiple times on a given a day since I am teaching the same plan for each class/prep period.
In the title area of the event, I will state what topic we are covering that day and be sure to select the appropriate calendar for that prep/class. In the description area, I will type out an outline of the plan and include any links to resources. I keep the structure of the plan consistent with four main areas: Objectives, Tasks, Assessments, and Standards.
I can easily copy/paste the description and post it as a note in my Edmodo groups or Google Classroom (or other learning management site) for students to access at home. By posting it to my LMS groups, students can access any attachments and ask follow-up questions if needed. While I can add attachments to the event, I prefer to post the attachments in Edmodo for students to access as the Calendar is more of a static landing page to see classroom events and not an arena for discussion.
Publicizing the Calendar
In the settings of each lesson plan calendar, set the calendar to PUBLIC. This will make it visible when you embed it in a Google Site that will be visible by students, parents, and administration.
The new and updated version of Google Sites is ridiculously easy to create a class web page with an embedded calendar: create the site with a page for each class/prep taught, and from the Insert menu in the Site editor, simply click CALENDAR to embed a calendar on that page. Be sure to hit PUBLISH so that your site goes live!
I provide the link to the class Google Site to parents at Back to School Night as well as demonstrate how they can see the day to day plans by clicking on the event for that day. I also email the link to the Google Site to my administration when I am submitting lesson plans rather than printing out pages of plans.
Recap
Lesson planning with Google Calendar and Sites is an efficient and quick way to track and publicize your day to day teaching from year to year for students, parents, and administration.
I can quickly record my own screencast or locate a video on one of their popular channels, such as YouTube, Khan Academy, National Geographic, TED Talks, Veritasium, Numberphile, and Crash Course. It is easy to upload the video, crop if needed, add voice or typed directions, and insert questions. Multiple choice questions are automatically scored, and teachers can provide feedback with the answers to provide students with follow up instruction. Scoring of students' typed responses is easy as well: teachers can give a numeric score out of 100 and typed comments to the student.
For today's post, I want to share my workflow for providing typed feedback on students' open-ended responses. Teachers know that assessment is a time-consuming, but vital part, of the learning cycle. For my EDpuzzle lessons, I will predominantly use multiple choice questions so that students are given immediate feedback, and I can quickly check and add scores to my gradebook using my OSU Rubric. So as to hold students accountable for the work, but not overly penalized for mistakes during formative assessments, students earn a grade in the gradebook based on where their raw score falls in the ranges below.
While providing immediate feedback with automatically scored multiple choice questions is very efficient, providing typed feedback on open-ended responses can be time consuming. Typed feedback, though, builds rapport with students and solidifies connections between the teacher-student and the student with the content. To speed up my typed feedback, I use a comment bank that I keep in Google Docs.
On a Google Doc, I type up feedback that I give to the students. Many make the same pattern of errors (need to elaborate, need to cite sources, etc) so I am often retyping the same sentences for multiple students. The copy/pasted feedback serves as the base of my feedback for I will add more personalized commentary (student's name, specific phrases from his/her response, etc) to the comments in Edpuzzle.
Quick steps:
1. Create a Google Doc comment bank
2. Split your screen: Comment Bank is open in one side, Edpuzzle open in the other.
3. Copy/paste the feedback to the Edpuzzle comment area.
4. Add personalized wording
5. Click COMMENT and give the student a score.
6. Repeat
So that I am not bogged down scoring open-ended responses, my Edpuzzle lessons are predominately multiple choice questions with one or two open-ended responses at the end of the video lesson. I am purposeful in the design of the lessons so that when students type open-ended responses, they are utilizing higher order thinking skills.
No matter the edtech or paper-based platform, the design of the lesson must align with the function of the lesson, and assessment techniques must be efficient and effective for all.
I realized that I was over complicating matters and making things too complex when it came to creating digital portfolios with my 9th grade ELA students. I am passionate about technology integration in my class, but I am mindful of how/why we use the technology. As I flip the learning in my class, it is easy to get inundated with the myriad of edtech tools and sites that are available. So, keeping things very simple, and sticking with what we know, I decided to capitalize on the power of Google Docs and hyperlinks to create digital portfolios with my students.
The portfolio is one Google Doc on which the student will list and link to each of the writing pieces, as well as write a brief reflection of what was learned about the process of writing.
The Quick Steps:
In Google Docs, create a template hyperdoc of the portfolio.
In Google Slides, create a slide deck that walks students through the set-up process.
In Google Classroom create an assignment and attach the slide deck ("anyone can view") and template doc ("generate an editable copy for each student").
Allocate time in class for students to work on the portfolio.
Score the portfolio each marking period.
The Template
If you haven't picked up a copy of The Hyperdoc Handbook, you better do so NOW. Author Lisa Highfill and all share strategies for creating Google Docs with an enhanced visual design. The template I created for the portfolio is organized by inserting tables to create title areas and lists of assignments. Also, I changed the background color of the page and the fill color of each table section. By changing the visual design from the usual white Google Doc, I am influencing students' initial reaction to the doc: because the portfolio doc looks differently than the other docs they've seen, they will react to it differently.
Students are allowed to personalize the doc and change the fonts and colors, but I want to make sure that they have a consistent theme to their visual design. Color palette generator such as Coolors and other activities that teach students about visual design facilitate the process.
Open the doc and go to FILE, MAKE A COPY to create
your own editable version of my template.
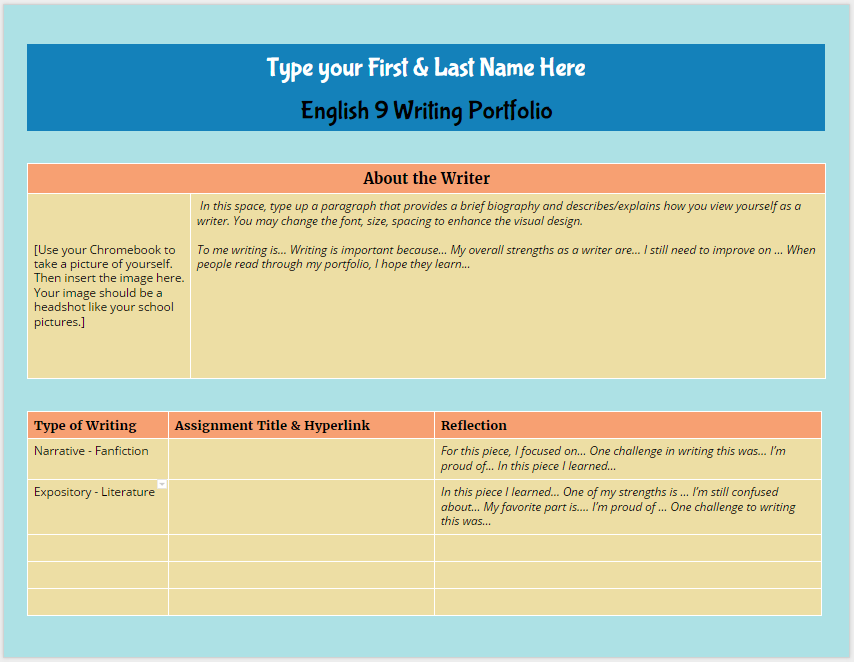
The sections of the portfolio doc include a heading area for the student's name, an about the Author section, and a list of the assignments that include a label for the type of writing, the assignment title and link to the student's writing piece, and an area for reflection on the specifics of the writing task. The most important area is the reflection. If I want students to act like authors, then I need them to think about the intention of their writing and reflection on the process of creation.
Setting Up the Portfolio
To lead students through the set up process in a flipped instructional manner, I created this slide deck that walks students through the process.
You'll notice that I also included the rubric for scoring the portfolio with in the slide deck. More on scoring later in this post.
Google Classroom Assignment
If you aren't using Google Classroom yet for your Google Docs workflow with students, you are missing out! Google Classroom makes managing student docs so much easier. For each assignment I create, I can attach resources and templates. Each attachment can be set to view only or editable by all, or I can have Google generate an individual copy for each student that has the file name and sharing permissions automatically created. No more untitled docs!
For the Digital Writing Portfolio Assignment in Google Classroom, I attached the slide deck (set to view only) and had Google generate an editable copy of the portfolio doc for each individual student. All docs created are housed in the folder for this assignment in my Classroom folder in my Google Drive.
As we finished up individual writing pieces, I allocated class time so that students could add the latest assignment. The beauty of using hyperlinks for each assignment is that my students are not just limited in creating Google docs of their assignments: anything that they create that is housed on the web can be linked to their digital portfolio doc.
Scoring the Portfolios
At the end of each marking period, I give students time to finalize their digital portfolio. In Google Classroom, the students click DONE to submit their assignment, thus removing editing privileges on the doc. I score the portfolio with the rubric below using the Doctopus and Goobric add-on in Google Sheets. After all portfolio docs are scored, I return the files to the students. At the end of the next marking period, they revise the portfolio doc and hit DONE on the same assignment I first created-- no need to create a new assignment for each marking period!
Philosophically, I am against putting grades on writing, but working within a system that mandates grades on assignments, I focus on providing feedback and ample opportunity to revise assignments until the student (and I) feel that the piece has met the objectives while also finding a way to get a numeric grade on the assignment.
If you notice, the rubric adds up to 100 points, but the columns for scoring are equivalent to a specific percentage and letter grade that aligns with the grade breakdown of my district:
A = 100-92
B = 91-83
C = 82-75
D = 74-70
F = 69-0
20/20 = A
18/20 = B
15/20 = C
12/20 = F
I do not give half scores or use other numbers for each column listed above. The numbers are the numbers, but you will see a greater range of scores when you look at the permutations of the possible rubric scores and what score shows mastery versus lacks proficiency.
Rubric design and scoring will have to be saved for another post. But, if you look at the permutations above, because I made set each column score to a specific number that aligns on the 100 percent/point scale, I've allowed for more possible passing scores than failing scores. As Rick Wormeli will tell you, the 100 point scale (especially in my district with 100-70 as passing) puts way too much emphasis on failing grades. My scoring flips this dynamic and puts the emphasis on the upper range.
BUT, the whole purpose of the digital writing portfolio is to de-emphasize grades and focus on publishing student work in a manner that is organized, reflective, and on-going, and using Google Docs as the housing system of students assignments is a method that is simple and sustainable. I don't have to worry about a special website or an app closing down in a few years, and students can easily replicate this process after high school graduation with their own personal Google Doc accounts to create portfolios for college and career.
One of my students, Matt D., created a presentation on how to use an iPad for academic use based on his experiences last year. We are a BYOD district, but still being rooted in paper, our paperless skills are still emerging. Part of the delay is that it takes time to figure out an effective workflow with new technology. Well, Matt has taken the guess work out of using an iPad in a BYOD classroom. As a pioneer among his classmates, Matt made it his mission to be paperless in my classroom last year, and this year, he is making sure that others can do it, too.
Take a look at Matt's presentation. We welcome any feedback and please share how YOU and your students use a paperless workflow. Also, keep an eye out for other posts that showcase the paperless workflow for other devices.
With the start of the new school year looming, a favorite topic of discussion among #flipclass teachers is workflow. Rookies want to know how to make flipping work with class procedures, and veterans are always tweaking what they do. Edmodo, Curriculet, and Google Drive are essential to productive workflow in my class.
Essentially, this is what I do:
Organize students into classes on Edmodo with all resources, agendas, links to edtech tools, assignments, and quizzes are completed in Edmodo.
Students go to Curriculet for reading texts.
Students use Google Docs for typing up essays and other assignments.
Edmodo
Edmodo is my online classroom space. Everything that I do face to face with students is also completed via Edmodo. From posting the daily agenda to taking quizzes to connecting with others, everything is done in Edmodo as you can see from the list below and public folder of classroom examples.
I create a main classroom group for each level I teach because I want to promote the online PLN experience. So all of my Honors 9 students are in one group regardless of period and all of my English 12 students are in another group. Students interact with others that they may see in class or merely pass in the the hall. When I name my groups I always use the following naming convention: School Year & Level. For example, 2013-14 English 9 or 2014-15 Honors English 9.
The daily agenda is posted as a Note with any attachments needed. I always date it and put a heading in all caps as well as a numbered list of activities for the day. I type up my lesson plans in a Google Calendar which is posted on my class website, and merely copy/paste from my plans to create the daily agenda. Click here to see a sample.
All work is turned in via Edmodo Assignments. Whether it is a final project or an online activity or a photo of a paper worksheet, students turn in their work on Edmodo because the assignment is automatically added to Edmodo's gradebook or Progress area which keeps a spreadsheet record of all assignments assigned to that group. This spreadsheet is my working gradebook and replaces the students' three-ring binder. Students still keep a notebook using any method they choose, but I no longer have to do paper-notebook checks. When parents, counselors, or administrators have a question about a student's performance, I have a record of the student's work at my fingertips. I can also see the student's performance in relation to other classmates. I transfer by hand scores to my district's gradebook as applicable.
Preparing for digital assessments, students complete quick Edmodo Snapshot assignments. Snapshot provides students with standards-aligned assessments for math and ELA. I can quickly choose the standards I want to assess and assign the questions to my students. Edmodo takes care of the rest from selecting the passage to writing the questions. I set the due date and track student progress, assigning later Snapshots to address deficiencies. Snapshot will be a weekly automatic assignment for my students in the coming school year.
Students access Edmodo apps for automated tasks or projects. TheNo Red Ink Edmodo app is added to my Edmodo groups so that I can quickly assign students grammar tasks without having the students log in to another site or make more work for me. Students also have access to other apps such as Powtoon, Pixton, Audioboo, and Dogo News for other online projects. I often ask my student to "Show Me" what they know using any online tool.
Students communicate and peer review in Edmodo small groups. I break up each main classroom group into smaller sub groups. I just go right down the roster and select students in alphabetical order. The small groups then becomes a place to share work that is turned in or complete online small group tasks. I may ask students to find a resource about parallel structure and post it to their small group or have them share copies of essays for peer review. By posting in small groups, we are keeping the main classroom page relatively clean.
Students are added to other main groups throughout the year. I will create other Edmodo groups for collaborating with others or delivering content in an asynchronous manner. When collaborating with other teachers and students across the country or globe, I (or the collaborating teacher) will create a new main group to which we add our students for sharing their work or completing collaborative tasks. I'm excited to try out a Writer's Corner group with California teacher Beth Oing and Maine teacher Natalee Stotz. This group will be an informal space for students to share whatever they are writing for peer review and feedback. For delivering content in an asynchronous manner, I will create a separate group for each unit. Check out this post on how I gamified The Odyssey using Edmodo.
Curriculet
Curriculet is my go-to tool for reading instruction. From uploading my own documents or articles found on the web to reading canonical texts to preparing students for PARCC assessment, Curriculet is essential to tracking my students' reading progress online. I've successfully flipped reading Romeo and Juliet and A Tale of Two Cities with my students. We've also read Great Expectations, Pygmalion, and current event articles related to the Great Depression and The Olympics. With Curriculet's premium library of contemporary texts being released this Fall, I'm excited to get my students reading more.
To use Curriculet, I create classes and give my students the classroom code. I'm not worried about my students having too many log ins because they click on the "Sign in with Google" button since we are a Google Apps for Education school. Their Google credentials can be used to create and sign into a Curriculet account. I assign an entire text to my classes and post a reminder in Edmodo for students to access Curriculet. The students read the text at home or in school on smartphones, tablets, Chromebooks, or computers, answering questions and quizzes embedded in the text to check their understanding. To see the student view, watch this quick video.
I use Curriculet's data analytics for formative assessment-- my students are allowed to make mistakes without too much penalty. I take a look at their time on task and their accuracy for answering the questions and quizzes and give the students' a holistic score in my gradebook. Using the OSU rubric, students receive Outstanding (100%) if they completed the task in an average amount of time and with an accuracy rate over 88%. Students receive a score of Satisfactory (88%) if their accuracy was in the range of 78-87%, and Unsatisfactory (75%) if they completed the reading too quickly (ie. they clicked through the questions instead of reading) and scored below 78% on questions and quizzes. All summative assessments are completed in Edmodo as either an Edmodo Assignment or Edmodo Quiz. I allow students to have Curriculet open in another browser window while completing the summative assessments.
To see behind the scenes in my Curriculet account, view this video.
Curriculet is also available as an app in Edmodo, but since many of my students have smartphones as part of my district's BYOD initiative and Edmodo apps are only accessible on computers and iPads, I do not utilize the Edmodo app version of Curriculet at this time. For elementary schools or 1:1 iPad districts, I would recommend accessing Curriculet through Edmodo.
Google Drive
Google Docs has replaced Microsoft Word in my classroom. While I still access files I created in Word or PowerPoint, my students primarily create documents and slides using Google Apps. We will have access to Microsoft 365 this year, but the simplicity and versatility of Google Apps have won my students over. I needed a word processing option for students on smartphones and Google Drive fulfills the need. Students can complete notes, Do Now activities, quick writes or other journal writing on their smartphones through the Google Drive apps.
We are a Google Apps for Education school, so the workflow is seamless. Students have accounts already created through school, so getting started is easy. Even though student Google Docs are shared with me, I still have my students turn in the link to their document in an Edmodo assignment. Again, I keep a record of all things in Edmodo. I'm excited to see what Google Classroom will do in terms of streamlining sharing documents with students, but in the meantime, this is how I used Google Drive with my students.
Daily directions, assignments, or Do Now activities are on Google Slides with the link to each presentation posted in Edmodo. Information is nicely chunked on each slide and it is easier for students to read than a lengthy Google Doc assignment.
Instructional Design
Edmodo is the hub of my classroom with Curriculet and Google Apps forming the spokes of our wheel of learning.
The daily schedule may vary, but essentially I follow this routine in our 43 minute class periods:
5 mins. Do Now Activity and review of answers-- as students walk into class they get started
3 mins. recap of objectives and timeline
25 mins. asynchronous activities or group work
5 mins. wrap up
This is my general plan per week:
Tuesday: introduce a new concept
Wednesday thru Thursday: work asynchronously or in groups applying the new concepts
Friday: whole class teacher-led activity reviewing and synthesizing the material
Monday: assessment on the previous week's content
Last year I was 1:1 with the Chromebook cart on Mondays, so I liked having students take Edmodo quizzes or finish up individual digital work on Mondays because we had guaranteed access. Sometimes I could get the cart mid-week, but it was never a guarantee as I shared the cart with four other teachers (each teacher taking a different day). So our mid to end of week activities featured BYOD, paper, and face to face tasks. While I do not let technology drive the learning in my class, technology is a vehicle for learning so our access to technology does factor in to our schedule.
I'm interested to read what others are doing with their students. So please reply with your questions, comments about #flipclass workflow methods.
I tried out the new Adobe Voice iPad app yesterday and made a video for my 9th grade students to view. In preparation for our Romeo and Juliet unit, we viewed and closely analyzed West Side Story. Keep in mind this is an English teacher's interpretation of film analysis. We discuss mise-en-scene, composition, motifs, camera angles, types of shot, and the overall feel of the film. I want my students to understand that artists make purposeful choices in the creation of their art and as an audience, if we look with an "informed eye" we can see the artists' intentions. Take a look and tell me what you think!
Adobe Voice is easy to use. The tutorial guided me through the steps, recording my voice for each slide, selecting layouts, music, and themes. It is limited on choices, but I can't complain because the price (FREE) more than makes up for the limited choices. The templates that are available provide enough options to create a schnazzy final product.
I would like the ability to add more text to the slides, but the app is called Adobe VOICE, so the obvious emphasis is on speaking rather than reading. As a workaround, I could save PPT slides as jpgs and upload the jpgs to Adobe Voice. The caveat is that you run the risk of resorting back to the proverbial "death by PowerPoint" phenomena. This is designed to be short, quick talking points--- granted my example above is on the long side, but I wanted my students to see and understand the progression that I presented. Keep in mind, the longer your presentation, the longer it takes to upload to the Adobe Voice site on the web. Sharing to social media or via email is easy, and once the presentation has been uploaded, you can grab the link or embed code.
Here are some tips:
Write a script about what you will say for slide. Stick to the script! Don't ramble!
Use inflection and articulation when recording your script. No one likes monotony.
Vary the layout and size of the pictures to keep your viewer intrigued.
Use bigger pictures for more important moments.
Search for pictures to use or create your own.
Smash Adobe Voice with other tools by converting PPTs or other visuals to jpgs for easy use with Adobe Voice.
Adobe Voice can be used by experienced and novice iPad users. For those who are looking to creating presentations for a flipped classroom experience on their iPads or want students to create their own, this is an easy and versatile tool.
ClassDojo iOS and Android apps now include ClassDojo Messaging — a new feature enabling teachers and parents to easily and meaningfully communicate about student progress. Users of Class Dojo and BYOD advocates will appreciate the ease with which they can keep parents connected to the classroom. Take a look at the screenshots below showing how ClassDojo Messaging will look on a personal device.
I'll be honest, I struggle with maintaining contact with my parents. I do the best I can between phone calls, email and Edmodo, but unfortunately I most often initiate specific contact when something negative has occurred. I really like that ClassDojo promotes positive interactions. ClassDojo Messaging users can blast out messages to the whole group of parents or direct message individuals, and with read-receipts there is no question that parents are looking at the messages. I also like that it is an app I can use on my personal device so I can walk around the room and not be tethered to my computer. I have to applaud ClassDojo for working to bridge the edtech gap between home and school, making all students, teachers, and parents, connected to learning.
Working in a large school district and being the mom of two girls in elementary school, I'm exposed to numerous germs everyday, and while I know I've built up a strong immunity over the years, sometimes I get sidelined with an ailment. Well, for the first time EVER in 15 years of teaching, I have contracted conjunctivitis (aka pink-eye). I will spare you the details, but know that it is gross, hurts, and my eye looks like it could be a zombie extra in a Walking Dead episode. I can't wear contacts; my eyes are light sensitive; I can't see that well, but my brain still is working. So, using the proverbial lemons to make the proverbial lemonade, I got to thinking about tools that could help the visually impaired and bolster auditory and speaking skills.
Voice Dictation
Searching the Chrome Webstore for voice keyboards, I came across this Chrome app, Voice Recognition. The navigation is easy to use, and as long as you have a webcam microphone built in, there is no need for an external mic. I also like that I can export my dication to Google Drive and Dropbox or save to computer or send via email. Accuracy, as with any voice recognition program, is dependent on speed and articulation. While I would want the dictation to be highly accurate, it does provide an opportunity for a lesson in revision of text. Pair up students with one doing the dictation and the other doing the editing, and you have an opportunity for a lesson on voice (literally) and intention in writing.
Screenshot of Voice Recognition
While I have to use Voice Recognition in the app, I'd like to find a tool that could be used in any browser window or program on a Chromebook or computer. On personal devices, I like using the Google Voice keyboard on my Samsung Galaxy S3 dictate into an open Google doc, but I haven't come across anything similar for Chromebooks/computers. Please share if you know of such a tool!
Read to Me
SpeakIt! is a Chrome extension where you highlight text that you would to have read aloud. After adding the extension to your browser, highlight the text, and click the icon in your browser tool bar. A little pop up box appears and you hear the text being read aloud. For the visually impaired, this extension is not as easy to use since you have to select text and click on a small icon, but for those who like being read aloud to and to reinforce reading skills, this extension is useful.
SoundGecko is site that will read an entire webpage article to you. Simply visit the site, paste in the URL and your email address, and start listening. SoundGecko can be used on any device or computer using a browser window. I can see (even with my pink eye) using SoundGecko during listening activities, asking students to listen and answer questions based on what they heard. Teachers could also use SoungGecko for BYOD stations where students practice listening skills.
Whether visually impaired or not, these three tools are useful for practicing speaking and auditory skills. Know of others? Please share!
Confused colleagues will ask me about Twitter: What are those number sign thingies? How do you chat? Do I friend or follow someone? Where do I find people to follow?
Hashtags (those number sign # thingies) are used to tag posts and help organize people in a chat. Tagging means to label with a keyword. The number sign provides a visual cue signifying the label. Tags can be self generated or recognized by groups of people as "official". When tweeting out links to resources, I tag the tweet (ie. include the hashtag and keyword) for the appropriate audience. For example, if I'm sharing a resource that English teachers would find helpful, I use the tag #engchat (English chat). I can incorporate as many tags as I can fit in 140 characters when trying to reach a larger audience. So if I my tweet was appropriate for English teachers who use technology and flip their classroom, I would use the hashtags #Engchat, #flipclass, and #edtech.
Professors and school-approved twitter accounts may also use hashtags for classes, athletics, and district events. You will often see me use the hashtag #teamMAIT when I want to share posts with my Masters in Instructional Technology classmates. Twitter and hashtags are an effective method for sharing resources and announcements. Since the tweets are always being sent, I can search for the hashtag to find relevant posts that I may have missed.
Besides tagging tweets, hashtags are also used to connect people during a chat. To participate in a live Twitter chat, sign on at the scheduled time and search for the hashtag. The moderator of the chat will post questions using an alphanumeric system: Q1 for question 1, Q2 for question 2, and so on. Participants reply by including A1, A2, respectively with their answers to the questions AND include the appropriate hashtag of the chat. If you don't include the hashtag, people who do not follow you and are participating in the chat will not see your posts, and you will miss out on the conversation.
Chats usually last an hour, but I can tell you from experience that it does not feel like an hour! My favorite chats to participate in are #Flipclass on Monday nights, #NJED on Tuesday nights, #patue and #edmodochat which are on Thursdays, and Teachercast's#TechEducator chat and podcast on Sunday nights. I try to participate weekly, but I'm not always able to when balancing home, school, and coaching. But if I miss the chat, all I have to do is search for the hashtag the next day and scroll through the tweets. Moderators of chats may also archive the chat using Storify or a Google Script.
The Official Twitter Educational Chat Schedule is a useful resource for looking for specific chats. Aside from being scheduled weekly, Twitter chats have been known to organically grow out of circumstances and when opportunities present themselves. Conferences will encourage participants to use a common hashtag to continue the conversation online (#CEL, #EdmodoCon, #NCTE to name a few), and I had the pleasure of moderating a serediptious #SnowEDin chat during a snow day-- educators who were off from school because of a snow day joined in at noon to talk about relevant topics. Just be aware of the hastags you choose: while those of us were focused on the educational aspects of being snowed in (hence the capitalization of ED in #snowEDin), others not participating in the chat posted generally about being snowed in using #snowedin. "Official" hashtags aren't all that official-- it is just a group of people agreeing on a common meaning of the hashtag.
Search the hashtag, then click on PEOPLE to see who is
uses this hashtag. Then click on follow to make a connection.
Twitter chats are an excellent way to find people to follow. By following people who share common interests, you are constructing meaningful connections in an ever-ongoing stream of information. You can then see who those people follow to find others to connect with. Visit my profile, @KtBkr4, and take a look at who I follow and begin to build your own Personal Learning Network in a few short clicks. There's no "friend requests" needed, and you can choose to unfollow someone at any time.
To learn all there is about using Twitter, visit Cybrary Man's Twitter Page. Jerry Blumengarten, aka the Cybrary Man, is simply amazing, and his superpower of curating information for educators to access on the web is a tremendous gift to all of us who engage in online learning.
As you become more adept with using hashtags, be sure to engage in some hashtag shenanigans or #hashtaggery to add some pizzazz to your tweets. Just be ware of excessively incorporating hashtagging in your daily life, as seen in the hilarious skit by Jimmy Fallon and Justin Timberlake.
I couldn't afford the cost of attending the entire NCTE conference this year in Boston, but I was able to attend and present at the Conference on English Leadership, an intimate conference tied to the main NCTE event that was held November 24-26.
The 2013 CEL convention focused on the theme of Transformative Literary Leadership and Learning, and my session was STOP BLEEDING RED INK: Using Paper and Online tools to assist in evaluating student work. I'm very passionate about changing the perception of English teachers as red pen wielding warriors. English teachers should not be lugging home piles of papers to red pen and spending 20+ hours outside of school grading student work. Available technology AND teaching strategies can empower students to create better products better than any red mark on a paper. I'm very grateful to Heather Rocco and the CEL leadership for the opportunity to share my thoughts how on to transform literacy learning in the classroom with people who can effect change in their districts.
Celebrity Sightings & Twitter
Twitter has become such an integrated part of my professional learning. Sharing resources, working out issues, and conversing on Twitter with like minded individuals has propelled my teaching practices. On more than one occasion, I was called "prolific" in reference to my tweeting habits during the conference-- if they only knew. One of the highlights for connecting via Twitter is being able to meet tweeps in person, face to face.
#CEL13 love that so many of those I follow on twitter are here in person!
— Kate Baker (@KtBkr4) November 25, 2013
There were quite a few people at the conference who I did not recognize until they mentioned their Twitter handle. One such moment occurred with Colette Benett: it wasn't until I saw her Twitter handle @teachcmb56 that I realized I follow her on Twitter and regularly read her blog. "OH! You're Used Books in Class! I love your blog!" was my immediate response when I connected with her and fellow teacher Stephanie Pixley during #CEL's social hour. Nothing beats discussing Odysseus, Frankenstein, and Pygmalion over a class of Cabernet.
Amazing geeky awesomeness. Talking abt The Odyssey over wine. #cel13
— Kate Baker (@KtBkr4) November 25, 2013
Colette made an interesting point in one of the sessions (please forgive my paraphrasing): Teachers are always doing dress rehearsals; we are never actually performing a final show. Every period we teach is just a dress rehearsal at best, and if we are lucky to teach the same prep, we can perform it multiple times with the 3rd showing probably the most successful. I think she is right! I wonder, how can teachers be on stage for a final performance? Evaluating teachers' performances via the Danielson model isn't the answer. I also wonder, why do teachers need to be on stage? Why not let the students "steal the show"? Let the teacher be the stage director or set designer-- more thoughts on this for another blog post.
Another moment was during the lunch keynote session, where I sat at a table with fellow educators Meenoo Rami, Amy Baskin, Kate Roberts, Maggie Roberts, Chris Lehman, and others: catching sight of @teachkate written on a name badge, I exclaimed, "OH! YOU'RE @TEACHKATE! I follow you! I'm @KtBkr4!" Once our Twitter handles were shared, we realized that we already "knew" each other.
#CEL's keynote line-up was jammed packed with Twitter-celebs, amazing educators who cut the edge. Eric Sheninger touted the importance of being connected in his conference opening keynote. Troy Hick's keynote on digital writing resonated with me for it focused on what I am trying to do with my students: get them writing more and for an authentic audience. I carted around my copy of Hick's Crafting Digital Writing hoping to catch an autograph. Donalyn Miller's keynote on fostering life-long readers was funny, smart, engaging. Meenoo Rami's keynote on connecting with her students and empowering their learning through relevant projects. I want to be in class with all of these people!
Tough decision: tweet or eat during @meenoorami 's keynote .... Actually not tough decision.... #cel13
— Kate Baker (@KtBkr4) November 26, 2013
One of many highlights for the conference was sitting with Meenoo Rami, Kate Roberts, Maggie Roberts, and Chris Lehman during lunch and unintentionally twitter-bombing Donalyn Miller's keynote. We realized rather quickly that the noise we heard emanating from the podium was her phone vibrating every time she received a tweet. We couldn't stop tweeting because her speech was relevant and inspiring, and needed to be shared.
One session really got me thinking about writing instruction. Erika Bogdany's Breaking Down Walls: how to break down the walls of a classroom for inclusive learning among staff and students. By changing the mindset and having staff model independent reading and participate in an Educator's Editing Workshop, student accountability, connections, and performance are increased.
AH-MAZ-ING Educator Editing Workshop breaking down walls. Ts & Ss see/learn more abt process of learning & selves. #cel13@ErikaBogdany
— Kate Baker (@KtBkr4) November 25, 2013
Interesting concept: Educator's Editing Workshop. Other subject area Ts read/edit Ss work. Strategic, Deliberate & structured #cel13
— Kate Baker (@KtBkr4) November 25, 2013
The Educator's Editing Workshop is simple: invite other staff members from other subject areas to sit with students and conference about their writing. Amazing concept. Erika is to be commended on her ability to pull this off. She really got me thinking about how I could bring this to my school.
If you've read my other blog posts about grading writing, I harp on this issue: writing is never finished. Erika made this point in session.
change language: "final draft" needs to be "BEST Draft (for now)" Can always make writing better later. #cel13#engchat#flipclass
— Kate Baker (@KtBkr4) November 25, 2013
So why do we mislead students by labeling it as "final"?
Another highlight was bumping into Penny Kittle and getting her to follow me on Twitter.
Yay! @pennykittle follows me! Gushing blushing goodness! Love twitter for connections & #cel13 for opportunity to meet f2f
— Kate Baker (@KtBkr4) November 26, 2013
I have some reading to do: I picked up copies of Penny Kittle's Book Love, Donalyn Miller'sThe Book Whispererand Reading in the Wild. While I have had a hand in crafting the curriculum, I'd like to see what else I can do with my students besides whole novel instruction for reading. While I didn't grab it YET, I'm also enamored with Chris Lehman and Kate and Maggie Roberts' concept of Falling in Love with Close Reading. Their session got me thinking about how much close reading I do with my students (A LOT). Really, we don't need to close read everything in class. It does take up a lot of time and I can always sense the moments when my students have had enough. So putting Kittle's and Miller's ideas into practice with this notion of selective close reading, I wonder how I can restructure my class so that reading is more student centered and authentic.
I want to close read every text I teach w my Ss. Good to put in perspective! It is ok to only do parts, not whole. #cel13
— Kate Baker (@KtBkr4) November 25, 2013
Really, CEL could be renamed Connecting English Leaders because this conference was more than just sharing ideas about the future of ELA in schools or sharing progressive projects in conference session. This conference promotes collaboration and connections. I have so much more to process and write about this conference-- probably another 10 blog posts, but to sum it up for now, take a look at these two tweets:
"at end of day we want to feel like we are energizing our colleagues" @MaggieBRoberts#cel13 Lift each other up, not be beaten down
— Kate Baker (@KtBkr4) November 25, 2013
Tab Scissors and Tab Glue are two extensions to use for quickly splitting your tabbed browser windows into groups and "gluing" browser windows back together. As a teacher who has to transfer grades from my Edmodo gradebook to my district gradebook, both extensions save me time minimizing and sizing windows. Anything that I need to do using split screens can be done more efficiently with Tab Scissors and Tab Glue.
Voki is a free web 2.0 tool used to create talking avatars. Characters can be customized to look like historical figures, animals, cartoons, and even one's self. For a fee, users can join Voki Classroom for more access to options and the ability to control privacy settings. Vokis are limited to 60 second recordings of either a user's voice or a computer generated voice, so I use Voki for quick assignments or part of a larger project.
Creating a Voki is very easy and can be done quickly. Even in the free version there are a plethora of options and characters to choose from. Users can change the background image and customize the look of the stock characters. Publishing Vokis is easy too and users can publish directly to sites as well as copy/paste a hyperlink or embed code.
My 9th grade Honors students incorporated Voki as part of their Create a Hero Project, creating a profile of their hero character and give him/her life using Voki. Students provided an overview or teaser for their hero's journey stories and published the Vokis on their student blog pages by embedding the Voki into their Hero Stories. I was able to show my students how to embed in HTML without having to go over the basics of coding-- something I have yet to learn. Students also shared their Voki with others in their Edmodo small groups.
Here are some examples from my students. Click on the PLAY icon in the bottom left corner of each one to hear a preview of their stories.
My students could also create Vokis of characters explaining concepts taught in class or summarizing chapters in a novel. World Language teachers could use Voki for recording students speaking short passages. History teachers could have students bring historical figures to life. Voki is an easy to use and versatile classroom tool for any subject area. For other lesson ideas, visit Voki's Lesson Plan Page.
This summer has been amazing, revitalizing, evolutionary, and ... and ... and... for my professional development. I could have written 20 posts about the events this summer, but I had no time to write! So, I will just sum it all up here.... I'm still having trouble slowing down my brain to get the thoughts on this page. Stop me in the hall, catch me on Edmodo, tweet to me, and I will just start gushing out of control.
Between attending FlipCon 2013, EdcampHome, EdmodoCon 2013, Google Apps Training & TeachMeetNJ, working with the Gobstopper folks, AND having the release of my first ever contribution-to-a-third-party-published-book (Flipping 2.0) AND meeting face to face with some amazing folks from my PLN, I couldn't have asked for a better summer. Seriously.
When I look at how much I have evolved as a professional educator in the past year, I am astounded at the exponential rate at which I have learned so much from the talented educators I've had the pleasure of collaborating and interacting with on Twitter, Edmodo, and this blog. Sounds redundant, "professional educator," but really it isn't--everything I have been doing has been outside of the classroom, yet still grounded in my teaching practice.
I constantly get asked, "When do you sleep? How do you have time for all of this?" I make time because I love it, and I honestly go to bed at 10 pm every night.
Guest post #7 is from Lotta Neumann, a teacher of Swedish and English language and language arts at Falkenbergs gymnasieskola in Falkenberg, Sweden, instructing 16-19 year old students. The school has been 1:1 since 2010, and Lotta is fortunate enough to be able to work with the finding and implementation of digital resources and best practices. Lotta has been using Edmodo since May 2012, and really appreciates "the global teachers' lounge" that Edmodo creates. Here is her recap of Edmodocon 2013:
In Sweden Edmodo Con started at 4pm. I had already declined one party invitation and told my family that I would be indisposed during the evening. I hadn’t really bothered to look at the program, partly because even if my English is good, I still find it hard coping with the special lingo from the various curricula. I have started to get my head around the British school system and think I might understand what the Common Core is, and Stibaly Johnson’s talk about how to use Edmodo definitely inspired me anyway.
The program seemed more airy than last year - there was time to make cups of coffee and my husband even managed to time dinner, not in the lunch break (that would have been at 10pm, Swedish time) but in between Patrick Fogarty and the Classroom Gymnastics. I missed the first couple of minutes of that and dropped in on the two very wise ladies Kate Baker and Liz Calderwood juggling the BOYD, blended learning and flipping, aided by Edmodo.
I never tweeted much, but these guys kept delivering one-liners that I’m considering printing and putting up on my office walls, and I wanted the few people that for some reason follow me to hear!
At about midnight, when Kevyn Klein did a brilliant run-through of my favourite Edmodo functions, I felt like it was time to call it a day, and a brilliant PD day it had been! I even said my thank yous and goodbyes in the backchannel group on Edmodo, and got some friendly waves back. But then I was just slightly curious about the Digital Citizenship talk, and got stuck in the interesting discussion. It got me thinking about how I could make use of the mentoring time when I get a new class this year...
Bijal Damani was amazingly inspiring! Her talk would restore the faith in humanity for most people; Yes, kids CAN do amazing things, and love to help others. Not every school may have the same support from the students’ parents, but we should certainly not hesitate to encourage and believe in the ability of young people to complete complex projects. And I was wide awake again.
Anna Davila’s thoughts on building leadership skills in the classroom was well in line with my own, and I found myself not nodding off, but nodding in agreement to everything she said. But now my contacts was really almost falling out of my eyes and I decisively closed my laptop, after saying good night.
Feeling I was missing out a bit, I crept into my bedroom, thinking about all the lovely people I had met and chatted with during the evening; learning so much and getting so much inspiration. I was already longing for the next EdmodoCon. And the participation badge....
And I had finally seen the point of Twitter!
P.S.
Next year, I’m going to host a EdmodoCon party! With nibbles.
I connected with Lotta via Twitter during EdmodoCon, and, as you can see, good teaching and effective learning practices are universal, no matter the language spoken. Thank you, Lotta!






+on+Twitter.png)
