Showing posts with label #flipclass. Show all posts

Sunday, March 3, 2019

Quick, Paperless Lesson Planning with Google Calendar and Sites

I integrate technology into my personal and professional practices so that I can save time and function efficiently. For many teachers, lesson planning can be time consuming and cumbersome as they write, execute, and send the plans to administration. Utilizing Google Calendar and a class Google Site as part of G Suite for Education, lesson planning can be quick and efficient. And, as everything is curated online, I do not need to print out reams of paper when submitting my plans to administration or keeping parents and students informed of events in class.


Quick Steps:

1. Create a calendar for each prep taught.
2. Create an all-day event for the lesson plan of the day.
3. In the description area of the event, type in the plan and links for the day.
4. Set the calendar to public and share with appropriate administrators.
5. Create a Google Site with pages for each prep taught and embed the calendars.
6. Share links to the Google Site as needed.


Calendar Organization & Settings


The longevity of Google Calendar makes it an ideal platform for paperless lesson planning. I have been writing my lesson plans in Google Calendar since September of 2013 and can easily access a specific day, month, or year with a few clicks. I do not organize and name my calendars by period as my schedule from year to year may differ. Nor do I need multiple calendars for the same level or prep, as I will have the same plan for each. Instead, I name and color code my calendars by the title or level of the class and use the same calendar every year I am teaching that prep. I can compare previous years' plans to the current school year, as well as copy/paste/edit descriptions of plans I reuse.

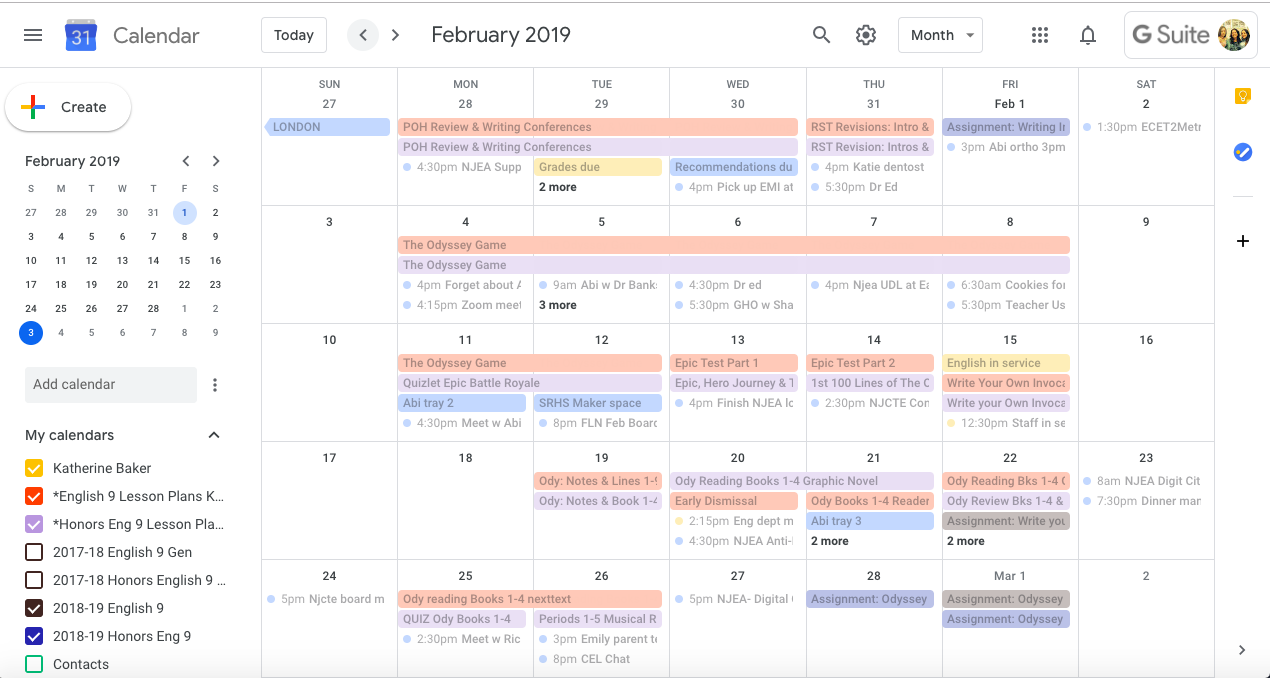
Here is a quick screenshot of my English 9 February 2018 and 2019 calendars. I can see that last year, I did not begin my Odyssey unit the end of the month, whereas this year, I am ahead of last year's pacing.


Writing the Plans


The day on which an event takes place is much more important the time it takes place. For each day I write plan, I create an all-day event. The time of event is irrelevant. I do not need my plans to be posted to a specific time because I am following the same teaching schedule every day, and it would be a waste of my time and energy to post the same plan for multiple times on a given a day since I am teaching the same plan for each class/prep period.


In the title area of the event, I will state what topic we are covering that day and be sure to select the appropriate calendar for that prep/class.  In the description area, I will type out an outline of the plan and include any links to resources. I keep the structure of the plan consistent with four main areas: Objectives, Tasks, Assessments, and Standards.


I can easily copy/paste the description and post it as a note in my Edmodo groups or Google Classroom (or other learning management site) for students to access at home. By posting it to my LMS groups, students can access any attachments and ask follow-up questions if needed. While I can add attachments to the event, I prefer to post the attachments in Edmodo for students to access as the Calendar is more of a static landing page to see classroom events and not an arena for discussion.


Publicizing the Calendar


In the settings of each lesson plan calendar, set the calendar to PUBLIC. This will make it visible when you embed it in a Google Site that will be visible by students, parents, and administration.

The new and updated version of Google Sites is ridiculously easy to create a class web page with an embedded calendar: create the site with a page for each class/prep taught, and from the Insert menu in the Site editor, simply click CALENDAR to embed a calendar on that page. Be sure to hit PUBLISH so that your site goes live!


I provide the link to the class Google Site to parents at Back to School Night as well as demonstrate how they can see the day to day plans by clicking on the event for that day. I also email the link to the Google Site to my administration when I am submitting lesson plans rather than printing out pages of plans.


Recap


Lesson planning with Google Calendar and Sites is an efficient and quick way to track and publicize your day to day teaching from year to year for students, parents, and administration.

Sunday, December 9, 2018

Groupwork Protocols for Blended & Flipped Learning

I am inspired by Catlin Tucker and her Station Rotation model, but in a 43-minute period, I struggle with how to effectively implement the rotation piece with my ninth grade students. Every second in our 43-minute period is precious. No matter how well I train my students, the transition time for station rotation is problematic. So I thought, "What if the stations rotate to the students?" And with that, my Group Agenda Protocol was born!


Protocols & Procedures


This protocol for a class routine is designed to promote student accountability and efficacy, shifting the role of the teacher from the “sage on the stage” who is tethered to the front board to the “architect of learning” who creates structure for learning to occur and the “guide on the side” who facilitates student learning by circulating through the room as students work. While similar in design to a station-based model, students do not move from their seats, but rather complete tasks listed on the agenda in a set amount of time.


Set-up Quick Steps:
  1. Set up the room. 
  2. Determine the agenda and copy/paste the chosen agenda format to a new document and fill in with appropriate information. 
  3. Print agendas and organize materials for each group. 

The teacher sets up the room to create four groups of six students for a 24-student class or five groups of six in a 30-student class. Students may choose their group or the teacher may assign students to a group.

Each table configuration is identified by a number, taping a sign to the wall near the group. The agenda and group roles are printed and placed in a basket or bin on each table. Materials needed for the class period are also placed in the bin/basket.

The group roles are designed to maximize student accountability and to allow for every student to participate within a group of 6 students. If there are fewer or more than 6 students in a group, they can double up on responsibilities/roles.


The Group Agendas

There are three versions of agendas that can be customized as needed with specific directions, links, and tasks. To add additional tasks to the agendas below, simply insert a new row into the table for v.1 or a new column (then merge cells to get rid of extra spaces) in the task area for v.2 and v.3 agendas. It is recommended that you keep an ongoing document on which you compile the agenda for each day. This document can be shared with students and administrators. To see an example of a month’s worth of agendas following v.1 format click here, and to see examples of v.2 and v.3, click here.

Agenda v.1 is designed with all groups completing the same tasks at the same time in a 43 minute period. Think of this as a common playlist of tasks. The class period begins with a Do Now, bell-ringer activity, then progresses through three tasks, and concludes with an exit ticket. During the class period, the teacher circulates through the room, helping students and groups as needed.

The number of tasks can be increased when following Agenda v.1, but be mindful of the decrease in time for each additional task. One way to manage tasks is to break up a big assignment or a worksheet into smaller chunks. For example, a four page packet of activities could be separated into four tasks, one page per task. This will allow students to practice pacing and makes a large assignment seem less intimidating for struggling learners.

Agenda v.2 is designed with all groups completing tasks via a rotating schedule so that the teacher can meet with each group at a designated time to check work or give a mini-lesson to the group. The class period begins with a quick Do-Now and then progresses through 4 non-sequential tasks of equal duration. The 4 tasks are completed in 8 minutes each, but can be completed in any order. Each group rotates through tasks using the provided sequence listed on the agenda. The period concludes with a 3 minute Exit Ticket.

Agenda v.3 is designed with a rotating schedule of 3 non-sequential tasks of varying duration (2 short tasks, 1 longer task). The 2-1 duration tasks are completed in two 8 minute blocks and one 16 minute block. One of the 8 minute tasks is spent meeting with the teacher. Each group rotates through tasks using the provided sequence listed on the agenda. The period concludes with a 3 minute Exit Ticket.

When following v.2 and v.3 of this group protocol, it is recommended that the number of groups be kept at four so as to maximize the amount of time the teacher visits each group. Included with the agenda templates is a version of Agendas v.2 and v.3, designed for groups of 5. If the number of groups and tasks are increased to five, then the time for each task and the time the teacher has to meet with each group is decreased from 8 minutes to 6 minutes per in a 43 minute class period. This may affect the quality of the meeting with the group, the work students are completing and may impact the type of tasks they are directed to complete in such a short time.

All Do Nows and Exit Tickets should be recorded in a student’s notebook, serving as an ongoing record of activity. The class tasks can be completed in the students’ notebooks or on teacher-provided handouts or digital files as appropriate.

To minimize the time spent by the teacher accounting for student completion of work, the Quality Controller should be recording the progress of each group member throughout the period on the provided chart located under the agenda, noting the completion of each task by each group member. Rather than collecting all papers for each group member and handing the papers to the teacher, students should keep evidence of the task completion in their notebook, which can be produced upon request.

At the end of the period, the Agenda page is turned in to the teacher. The Agenda is kept on file as documentation of student participation and behavior. The teacher can award participation points to each student based on the number of tasks completed. For example, if Biff Bifferson only completed 3 out of 5 tasks, a grade of 3 out of 5 can be recorded in the gradebook for that day’s participation. The teacher can follow up with each student and verify the authenticity and accuracy of the completion of work in a quick and efficient manner. If the student makes up the INC assignments, the teacher can easily update the gradebook.

Folks who attended FlipTech East Coast and Rewire conferences got to experience the Group Agenda Protocol first hand. Below are the slides for the session.

The Group Agenda Protocol is a method for maximizing the precious time we have in class and for promoting student efficacy and autonomy in a structured learning environment.


Digital Assessment Techniques with Edpuzzle

Edpuzzle is at the center of formative assessment in my flipped classroom.  From syncing with Google Classroom to quick checks for understanding, Edpuzzle is my go-to tool for assessing students' learning with video lessons. I have used Edpuzzle to flip my Back to School Night, blend with paper texts while reading audiobooks, and deliver instruction in professional development workshops.

I can quickly record my own screencast or locate a video on  one of their popular channels, such as YouTube, Khan Academy, National Geographic, TED Talks, Veritasium, Numberphile, and Crash Course. It is easy to upload the video, crop if needed, add voice or typed directions, and insert questions. Multiple choice questions are automatically scored, and teachers can provide feedback with the answers to provide students with follow up instruction. Scoring of students' typed responses is easy as well: teachers can give a numeric score out of 100 and typed comments to the student.

For today's post, I want to share my workflow for providing typed feedback on students' open-ended responses.  Teachers know that assessment is a time-consuming, but vital part, of the learning cycle. For my EDpuzzle lessons, I will predominantly use multiple choice questions so that students are given immediate feedback, and I can quickly check and add scores to my gradebook using my OSU Rubric. So as to hold students accountable for the work, but not overly penalized for mistakes during formative assessments, students earn a grade in the gradebook based on where their raw score falls in the ranges below.


While providing immediate feedback with automatically scored multiple choice questions is very efficient, providing typed feedback on open-ended responses can be time consuming. Typed feedback, though, builds rapport with students and solidifies connections between the teacher-student and the student with the content. To speed up my typed feedback, I use a comment bank that I keep in Google Docs.

On a Google Doc, I type up feedback that I give to the students. Many make the same pattern of errors (need to elaborate, need to cite sources, etc) so I am often retyping the same sentences for multiple students. The copy/pasted feedback serves as the base of my feedback for I will add more personalized commentary (student's name, specific phrases from his/her response, etc) to the comments in Edpuzzle.

Quick steps:
1. Create a Google Doc comment bank
2. Split your screen: Comment Bank is open in one side, Edpuzzle open in the other.
3. Copy/paste the feedback to the Edpuzzle comment area.
4. Add personalized wording
5. Click COMMENT and give the student a score.
6. Repeat


So that I am not bogged down scoring open-ended responses, my Edpuzzle lessons are predominately multiple choice questions with one or two open-ended responses at the end of the video lesson. I am purposeful in the design of the lessons so that when students type open-ended responses, they are utilizing higher order thinking skills.

No matter the edtech or paper-based platform, the design of the lesson must align with the function of the lesson, and assessment techniques must be efficient and effective for all.


Sunday, September 3, 2017

Digital Dashboard Document

This year I am trying a more transparent and strategic approach to my technology integration.  I've always been mindful of the purpose of the tool, but I wonder if I've consistently conveyed that purpose to my students and colleagues.  I have a plan. I know what I'm doing, but do others see it?

So, to get things started, I created a Digital Dashboard Google Document on which my students will see what sites we will be using consistently, the rationale for using that site, and an area in which they will type in login information---not their actual password, but hints or clues in case they forget. There are important class links to district sites, as well as extra rows for students to add additional sites they may choose to frequent.

Both Edmodo and Google Classroom give users the ability to generate an editable copy for each student with the file name and sharing permissions, so in the event that someone does not remember his/her password, the student can access the doc or I can offer clues.  Many of the tools we will employ in class allow the teacher to reset passwords, but I want students to be responsible for their accounts before I access my dashboard.

If you like this design, go ahead and snag a copy, customizing it for your students. In the comments for this blog post, please share how you convey the purpose of technology integration to your staff and students.


Saturday, September 2, 2017

How to Flip Back to School Night

In a previous post I shared about the results of flipping Back to School Night. Today, I'm going to show you step by step how I used blended learning to achieve those results.

The first few days of school:  (Nothing crazy here)  Have your Class Expectations typed up on either a Gdoc or Word document, photocopied and distributed to the students.  I also include an area on the document for student and parent signatures.  Give your students a few days to obtain the parent signatures.

I do not read the expectations document to the students in class because all teachers in all other classes are doing the same thing and my expectations will get lost in the shuffle.  I do tell the students that they are to read the document carefully before signing.

So what do students do instead of passively sitting listing to me drone on about the course expectations? We are jumping right in to learning activities: icebreakers, group work, problem solving,  etc.  For the 2017-18 school year, I'm going to start with an editable Escape Room / Break Out activity created by Nouvelle ELA. I don't normally purchase items from Teachers Pay Teachers, but not being experienced in creating my own breakouts yet, I thought this was a worthy investment, and at less than $6, a real deal!

Recording & Delivering the Video:
There are a few simple steps for recording your video and making it interactive for parents and students.

  1. Prepare your recording space by adjusting the lightning, background props, and alerting others that you don't want to be interrupted. Since you are providing an overview of your course, it is important to record your video in your classroom space. I put a sign on the door stating that I'm recording and do not want to be disturbed. 
  2. Create a title slide for your video using Google Slides or PowerPoint. Keep it open on your desktop.
  3. Have open your Course Expectations document.
  4. Open Screencastomatic or Camtasia, and select recording a portion of your screen and have the picture in picture on. You want folks to see and hear you. So don't be camera shy! You will size the frame so that it captures the slide first. Tip: you don't need to put your slide in present mode, simply have the recording frame capture the area of the slide.   
  5. Record a quick introduction stating your name and the course. Hit PAUSE on the recording. 
  6. Switch to your course expectations document, resize the recording frame, and hit record.
  7. As you talk through the expectations, you will slowly scroll through the document. Try not to read from the document verbatim, and do not ramble!  This video must be kept under 15 minutes. 
  8. If you plan on importing the video into EDpuzzle or another interactive video tool, strategically pause after important moments so that you will have spaces to insert the questions which will check for understanding while watching the video.
  9. After you have finished talking through your course expectations, pause the recording, switch back to the title slide or create a slide that includes your contact information, resize the recording frame, and record a brief closing message. This will give your video a more polished feel by capping the ends with an opening and closing slide.
  10. Create a handout of questions to accompany the video. If using an interactive video tools such as EDpuzzle, insert the questions to check for understanding. 
  11. At least two weeks prior to Back to School Night, assign the video lesson as homework, the student and parent must watch it together! The two week time frame allows parents to work around their schedules.
  12. So as to prevent tech issues from occurring, provide multiple avenues with which parents and students can access the video and reinforce that all answers are to be written on the question handout page. No matter the hardware, EDpuzzle allows for folks to view either by signing in to their account or through Guest Mode, so parents can experience the tool along side their student, but you don't have to worry about the student not completing the assignment if they have trouble logging in to their account at home. 
  13. As students turn in the questions page, review the responses and make note of any patterns: if many got the same question incorrect, then you need to address the issue on Back to School Night and follow up with the parent individually in an email.


After the Video: Following up with parents after the video is important for community building and creating an open dialogue with parents.  All parents should be sent an email thanking them for their completion of this task and inviting them to Back to School Night.

If your Back to School Night is anything like mine (9 minutes per class with 5 minutes between each), it is impossible to do a deep dive and convey all of the information about your course to parents. Also, due to work schedules and such, not all parents attend Back to School Night, so rather than thinking of this event in terms of information delivery, focus on how to let the parents in the room experience your class with a short learning activity. Let the video be the information delivery mechanism, as you can ensure all parents and students take the time to view it and answer the corresponding questions.


Thursday, December 15, 2016

Digital Portfolios with Google Tools

I realized that I was over complicating matters and making things too complex when it came to creating digital portfolios with my 9th grade ELA students. I am passionate about technology integration in my class, but I am mindful of how/why we use the technology. As I flip the learning in my class, it is easy to get inundated with the myriad of edtech tools and sites that are available. So, keeping things very simple, and sticking with what we know, I decided to capitalize on the power of Google Docs and hyperlinks to create digital portfolios with my students.

The portfolio is one Google Doc on which the student will list and link to each of the writing pieces, as well as write a brief reflection of what was learned about the process of writing.

The Quick Steps:

  1. In Google Docs, create a template hyperdoc of the portfolio.
  2. In Google Slides, create a slide deck that walks students through the set-up process.
  3. In Google Classroom create an assignment and attach the slide deck ("anyone can view") and template doc ("generate an editable copy for each student"). 
  4. Allocate time in class for students to work on the portfolio. 
  5. Score the portfolio each marking period.

The Template

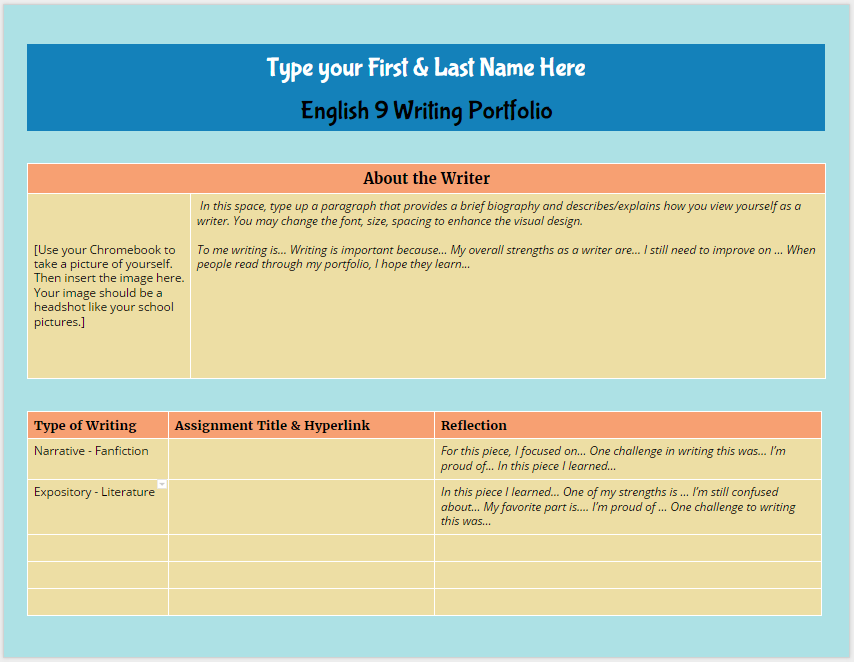
If you haven't picked up a copy of The Hyperdoc Handbook, you better do so NOW. Author Lisa Highfill and all share strategies for creating Google Docs with an enhanced visual design.  The template I created for the portfolio is organized by inserting tables to create title areas and lists of assignments. Also, I changed the background color of the page and the fill color of each table section. By changing the visual design from the usual white Google Doc, I am influencing students' initial reaction to the doc: because the portfolio doc looks differently than the other docs they've seen, they will react to it differently.

Students are allowed to personalize the doc and change the fonts and colors, but I want to make sure that they have a consistent theme to their visual design.  Color palette generator such as Coolors  and other activities that teach students about visual design facilitate the process.

Open the doc and go to FILE, MAKE A COPY to create
your own editable version of my template.


The sections of the portfolio doc include a heading area for the student's name, an about the Author section, and a list of the assignments that include a label for the type of writing, the assignment title and link to the student's writing piece, and an area for reflection on the specifics of the writing task. The most important area is the reflection. If I want students to act like authors, then I need them to think about the intention of their writing and reflection on the process of creation. 


Setting Up the Portfolio

To lead students through the set up process in a flipped instructional manner, I created this slide deck that walks students through the process.


You'll notice that I also included the rubric for scoring the portfolio with in the slide deck. More on scoring later in this post.


Google Classroom Assignment

If you aren't using Google Classroom yet for your Google Docs workflow with students, you are missing out! Google Classroom makes managing student docs so much easier.  For each assignment I create, I can attach resources and templates. Each attachment can be set to view only or editable by all, or I can have Google generate an individual copy for each student that has the file name and sharing permissions automatically created. No more untitled docs!

For the Digital Writing Portfolio Assignment in Google Classroom, I attached the slide deck (set to view only) and had Google generate an editable copy of the portfolio doc for each individual student.  All docs created are housed in the folder for this assignment in my Classroom folder in my Google Drive. 


As we finished up individual writing pieces, I allocated class time so that students could add the latest assignment. The beauty of using hyperlinks for each assignment is that my students are not just limited in creating Google docs of their assignments: anything that they create that is housed on the web can be linked to their digital portfolio doc.

Scoring the Portfolios

At the end of each marking period, I give students time to finalize their digital portfolio. In Google Classroom, the students click DONE to submit their assignment, thus removing editing privileges on the doc. I score the portfolio with the rubric below using the Doctopus and Goobric add-on in Google Sheets. After all portfolio docs are scored, I return the files to the students. At the end of the next marking period, they revise the portfolio doc and hit DONE on the same assignment I first created-- no need to create a new assignment for each marking period! 

Philosophically, I am against putting grades on writing, but working within a system that mandates grades on assignments, I focus on providing feedback and ample opportunity to revise assignments until the student (and I) feel that the piece has met the objectives while also finding a way to get a numeric grade on the assignment. 


If you notice, the rubric adds up to 100 points, but the columns for scoring are equivalent to a specific percentage and letter grade that aligns with the grade breakdown of my district:

A = 100-92
B = 91-83
C = 82-75
D = 74-70
F =  69-0

20/20 = A
18/20 = B
15/20 = C
12/20 = F

I do not give half scores or use other numbers for each column listed above. The numbers are the numbers, but you will see a greater range of scores when you look at the permutations of the possible rubric scores and what score shows mastery versus lacks proficiency.


Rubric design and scoring will have to be saved for another post. But, if you look at the permutations above, because I made set each column score to a specific number that aligns on the 100 percent/point scale, I've allowed for more possible passing scores than failing scores. As Rick Wormeli will tell you, the 100 point scale (especially in my district with 100-70 as passing) puts way too much emphasis on failing grades. My scoring flips this dynamic and puts the emphasis on the upper range.


BUT, the whole purpose of the digital writing portfolio is to de-emphasize grades and focus on publishing student work in a manner that is organized, reflective, and on-going, and using Google Docs as the housing system of students assignments is a method that is simple and sustainable. I don't have to worry about a special website or an app closing down in a few years, and students can easily replicate this process after high school graduation with their own personal Google Doc accounts to create portfolios for college and career.


Sunday, October 16, 2016

Blending Active Reading & Conversations with EDpuzzle

As I integrate technology into my classroom, I want to make sure that my students do not have their faces in a screen all the time. Also, I want to capitalize on creating opportunities for my students to practice listening and self-pacing skills. Blending paper with digital media and face to face interactions with digital learning, I created checkpoints in an EDpuzzle video lesson that would encourage students to close read a text and "Turn and Talk" to answer text-based questions accurately.


Building on previous teacher-centered lessons from our reading of Richard Peck's “Priscilla and the Wimps” and Richard Connell's “The Most Dangerous Game” in which we actively read texts together, students encountered a text for the first time in such as a way as to practice self-pacing skills during an in-class flipped lesson. In an effort to flip my reading instruction and to encourage students to actively read, I edited a preexisting audiobook video on YouTube to include the text of "The Secret Life of Walter Mitty" by James Thurber. I then uploaded the new version to EDpuzzle and embedded the checkpoint questions, tagging each with a NJ Learning Standard for ELA 9th grade (formerly known as Common Core Curriculum Standards).


Each student logged in to EDpuzzle on his/her class Chromebook, and then synchronizing with a partner, hit play and listened with personal headphones to the audiobook while reading along with a paper copy of the story.


As you can see from the EDpuzzle lesson below (go ahead, try!), at various points in the story, the video would pause and students were directed to mark up their paper copy of the text so that they could better understand the narrative structure, as well as answer comprehension questions. Students would turn and talk to their partner to discuss the directions and questions. I navigated around the room, listening to the partner conversations and seeing what students marked on their paper copy. It was immediately apparent if a student recognized the ellipsis or not, and I was able to quickly confirm or redirect as needed.


After marking up the paper text, students submitted their answers to the questions in EDpuzzle and were given immediate feedback on their accuracy, including an explanation as to why each answer was correct or wrong. I also tracked student progress in EDpuzzle and mark typed-in responses as correct/incorrect while students work through the video.


Despite the video being under 12 minutes, student conversations extended the lesson time. Those who talked too long or got off topic soon realized the consequence of not staying on task: Students who did not finish the lesson in class were instructed to complete the lesson prior to the next class meeting.


Even though the visual design of EDpuzzle’s site is different from PARCC or other online tests, the digital literacy skills students are using to answer standards-based questions will help prepare students for future digital standardized assessments. And by having students work synchronously with a partner, they are able to practice interpersonal, conversational skills.

Wednesday, July 20, 2016

Connecting with Colleagues at Flipcon16

While I couldn't be at Flipcon16 in Allen, Texas in person, I was able to converse with flipped learning pioneer Aaron Sams, Flipcon keynote speaker Tyler DeWitt, Flipped Learning Network Board Charman Ken Bauer, and flipped educator and author April Gudenrath via a Google Hangout about nonlinear learning in today's classroom.


Saturday, November 14, 2015

Flipping ELA-- More than Students Reading Books at Home


I had the wonderful privilege to present at the 2015 NJEA Convention in the Flipped Learning Theater with the pioneering Jon Bergmann and the ever-enthusiastic Marc Seigel. I presented two sessions:  Flipping the English Language Arts Classroom and Technology Tools for Flipped Reading.


My slide decks are below. I'm really proud of my visual design for these slides! Slide Carnival has some excellent templates that can be customized. Be sure to click on the hyperlinks within the slides for access to resources. Lots of goodies!


Speaking with Jon Bergmann at the convention for his BAM radio show, "The Flip Side," the question was broached, "Well, isn't English already flipped?  Read at home and come to class ready to apply?"  My answer is a resounding NO! For some students, reading is the difficult task, and I want to be present with my students for the difficult tasks. I can Flip 101 (aka replace live, direct instruction with video or tech tool) many things in the classroom, including reading, but I need to make sure that students are adept at the skills when we are face to face before I send them home with flipped tasks to complete.  The "face-to-face before do at home" time will vary depending on the content.  For some material, I need 5 minutes to make sure students are adept, but for other skills or content, my students may need multiple class periods to demonstrate that they are proficient independent learners.

I am a big fan of the "in-class" flip:  allow students to practice self-pacing and independent learning in class rather than at home.  Remember, the primary premise of Flipped Learning is to make the best use of face-to-face time with your students. So if this means they need guided, independent learning (I know, such an oxymoron) prior to unsupervised, independent learning (I know, redundant), then that is what I will do.  The flip at home will not be successful, and we will lose precious face-to-face time if I don't scaffold the process and gradually release control to the students.

The Flipping ELA Slide Deck features some activities and resources for how to Flip 101 and Mastery Flip an English Class. I've learned so much from my Flipped ELA peeps that I can not take credit for all the things in the slides. While I use what I share on the slides with my students, the original ideas may have come from one of the phenomenal flipping ELA teachers listed towards the end of the slide deck.


The Tech Tools for Flipping Reading will provide some examples of Flip 101 screencasts for modeling close reading, as well as edtech tools such as Booktrack Classroom and Curriculet for flipped reading instruction.  And make sure you listen to the interview with Jon Bergmann because I share how my students practice close reading using Google Docs as we Explore-Flip-Apply author's purpose and literary devices in texts.


Be sure to reply in the Comments to this post with your strategies for flipping your class or any questions you may have about how to flip!


Tuesday, July 28, 2015

One Solution for Tracking Standards Based Learning

I wrote yesterday about my experience with standards-based learning/grading and solicited my readers to submit their templates and tools for tracking student progress.  My edubuddy Tom Driscoll, master of mastery learning, shared some resources with me via Twitter.


I took a look at Jumprope and Mastery Connect, but I'm concerned about making more work for myself by using other platforms (as well as the cost!).  I want to work smarter, not harder, and not be like Alice falling down the rabbit hole learning a new and managing a new-to-me assessment platform. I already use Edmodo, Google Classroom, Curriculet, and my district's gradebook program Genesis. I don't want another platform.  And I took a look at Tom's spreadsheets: WOW!  Prior to Google Classroom, Tom would have each of his students create a copy and share it back with him.  I could adapt Tom's spreadsheets and have Google Classroom create an editable copy for each student to fill out throughout the marking period.  More on this to come....

This got me thinking:  what if I devise a way that students self-evaluate themselves and provide evidence of meeting the standards? My students are trained to peer and self-evaluate using Google Forms, so why can't I adapt that process so that students will make a standards-based portfolio that documents how they have met the Common Core ELA Standards?

If students are doing the data entry, I can save myself time and ensure that they are part of the process.  Here is my thought:  What if I create a Google Form for students to select the standard and provide a link to the artifact that meets that standard?  My high school is a Google Apps for Education school, so my students are completing their tasks predominately in Google Drive.  As long as their learning outcomes live on the web, they can provide a link to the item.  The Google Form will be used for the entire school year and all entries will be located on one spreadsheet that I can sort.

So here is the form I created to track students' summative outcomes in meeting the Common Core ELA Standards:


On the spreadsheet of responses, I could use "Summary of Responses" to see the auto-generated pie charts and graphs of data or I can color the spreadsheet to analyze the data. Other subject area teachers could use this same method to track summative student performance.  What do you think?  

Tuesday, July 21, 2015

Collaboration & Community

The word "collaboration" is thrown around so much that it should be the center square on a bingo board.  Not that I am denouncing or mocking collaboration, on the contrary, I believe in the power of collaboration and think we can take systemic approach whether collaborating with folks across the country or the hallway.

What is the impetus for collaboration?  I often think about what motivates people to do things. Maslow's Hierarchy of Needs is always floating around in my brain. If I'm hungry, my stomach needs to be filled, I am motivated to eat. If I'm confused by something, I'm motivated to ask a question and seek answers.  If I don't know how to do something, I am motivated to find people to teach me. As a swim coach, I constantly think about motivating my swimmers through tough workouts or difficult meets.  As a classroom teacher, I think about fostering intrinsic motivation in my students.  As a colleague part of a large professional network, I see motivated folks abuzz with activity.  I realized the impetus and motivation for anything in life comes down to one simple thing: fulfilling a need. Collaboration won't work if you don't feel the need for it to occur.

The first step with any collaboration is to find people to work with (duh!) and the purpose of the collaboration. Serendipitously, I've connected with like-minded folks on Twitter via #flipclass and we've collaborated on numerous projects: research projects, writing groups, and overall curriculum. We discussed community building during last night's #flipclass chat.  The Flipped Learning Community is the most collaborative group of folks I have ever met and this got me thinking about why that was so:


I think the #flipclass folks collaborate so well because we all have recognized a need to change. We weren't satisfied with how we were teaching and felt the need to evolve. I'm greatly over simplifying things in my response above and in this post, but part of the lack of collaboration locally may be due to others not having a need to change or understanding how to change. If there isn't a need, why do it?

About 10 years year ago, I collaborated with two other English teachers in my hall to craft a freshmen curriculum that would lay the groundwork for prepping students for the NJ-HSPA exam taken in 11th grade.  The power of that paper-based collaboration was seen in our exemplary test scores (I know that isn't the only measure of success, but prior to the great digital data era we are in now, those scores were important). We saw a need and fulfilled it with collaboration.  Now that HSPA is gone and PARCC is king (for now), we are recognizing the in-house need to collaborate and prep our students again.  While I do collaborate with individual colleagues on lessons, I wish a standardized test wasn't our primary extrinsic motivation for large-scale collaboration. I want to collaborate so that we can be #BetterTogether-- the sum of all of our parts creating something greater than the whole.

Throughout the 2014-15 school year, I was able to collaborate at home with a new to my district English teacher who also taught senior English next door to one of the classrooms I used this year.  My traveling schedule dictated that we collaborate online via email and Google Drive, creating lessons for the new-to-both-of-us senior English prep.  Having taught senior English only for the first time 2 years ago, I did not feel like an expert in my craft and welcomed her ideas.  We had similar teaching styles and enjoyed working digitally. Our collaboration was born out of a need to strengthen our understanding of the texts we were teaching to better engage our students.  I greatly appreciated our collaboration and hope it will continue when I'm on the other side of the building teaching freshmen full time again.

So as we are moving more and more towards paperless learning, I have been thinking about how to craft a digital curriculum-- house all of those lessons and materials I create with colleagues.  I presented on the technical aspects of collaboration for curriculum design at NCTE's Conference on English Leadership (CEL) in November 2014. While I've evolved many of my classroom activities and resources to a digital format, there has been little digital collaboration on a departmental level--other than emailing Word files back and forth or keeping an inventory of books via Google Sheets--with my colleagues in my building.  The objective of my CEL session was to give other ELA educators easy to use tools and strategies for creating, sharing, and housing an archive of digital resources particular to their curriculum.

After looking through the slides below, I'd love to read about your strategies for collaboration. Heck, we could collaborate about collaboration!

Am I thinking too much out of the box?

Do you have a better way?


Monday, July 20, 2015

Session Formats & The Grade Divide #flipcon15

Lindsay Cole and I led a session at #Flipcon15 on the great divide between grades and learning, entitled "The Grade Divide"  (get the pun?).  When we first wrote up our proposal for this session, we envisioned small group / roundtable discussions where participants shared their opinions and best practices with getting students to focus more on learning and less on the grades.  When we learned that we were a featured session held in the large lecture hall being streamed to the virtual audience, we recognized that our original session format needed to shift.

When my students write, I constantly have them focusing on the Task, Audience, and Purpose (TAP) of the writing: What are you writing? Who are you writing for? Why are you writing this?  The same questions apply to giving presentations.  What are you presenting? Who are you presenting to? Why are you presenting? The answers to the TAP questions will drive the session format.

Lindsay and I knew that we did not want a "sit and get" type session, nor could roundtable discussions work in a lecture hall of static seating with a virtual audience viewing the live action in the room. We decided to try a talkshow style format: pose a question to the group, poll the physical and virtual audience for their general reaction, share our specific stories, and have audience members volunteer to share their stories as well.


The greatest fear for the talkshow style session is that no one will show up and no one will participate.  As you can see from some of the tweets, people showed up AND participated. If you view the archive of our session, you'll see me dashing about with the handheld mic.


In order to engage our audience, we took a different approach with our slidedeck, as well the session format. When thinking about how to design your slide deck, answering the TAP questions will determine the type of format for your session.


Lindsay and I realized that this session couldn't be "death by PowerPoint" with gobs of information on the slides. So to spark participants, each slide had a meme and guiding question.  We were purposeful in our selection of memes--the meme had to work with the guiding question and be school appropriate.  Additionally, to give us something to talk about and engage the audience, we added in polls and discussed the results. So the gist of our format was: poll audience, tell our stories, view the poll results, and have audience members tell their stories. By asking a poll we could have everyone participate and then focus in on specific folks to share their stories. What was the purpose of our session?  Get people talking!  We couldn't get them talking if we were having them read slides full of information.


Reflecting on the session, I think it went very well, although it was a bit rushed at the end.  We could easily have stretched this 60 minute session into 90 minutes without editing the slidedeck. And as evident from the tweet below from flipped learning pioneer and band leader Aaron Sams, the virtual audience was having a very lively discussion.  Our moderator, Dan Spencer, did a great job keeping Lindsay and I informed about the virtual audience, even stating at one point the stream was flowing so fast he could barely keep up. I'd like to figure out a better way--other than on Twitter-- for the virtual attendees to interact with the physical audience in the room. It would be cool to somehow have them share their stories via GHO during the session.


If you were in the audience for this session, what did you think?  Anything Lindsay and I could have done differently/better?

Whether or you were there or not, how do you create conference sessions that engage the audience?


Saturday, July 18, 2015

Clicking with Cliques at Conferences #Flipcon15 #ISTE2015 #ECET2


We've been having a discussion in the newly formed #Flipcon15 Continued Voxer group about how to get new attendees more comfortable and connected at the conference. Check out Jason Bretzmann's blog post and Christina Roy's post on this subject too.  Attending large conferences is an overwhelming experience:  so many sessions, so many people, so many places!  I would not recommend STARTING to form a Professional Learning Network when attending a conference for the first time.  In order to have a connected experience at a conference, the connections need to be made before I ever set foot on site.

I did not learn about ISTE, ECET2, or Flipcon from an advertisement online or in a mailer. I am not motivated to attend the conferences because of the glossy pictures or catchy graphics.  I am motivated to attend conferences because of the PEOPLE.

Having an insatiable hunger to learn, I first dove into the professional education pool through Twitter.  The very first conference I "attended" (ok, lurked via Twitter) was the 2012 State of Now #140 conference in New York City. Happening upon the link to the live stream of Chris Lehmann's keynote, I was captivated. I was even more enthralled as I realized folks were talking about the conference through Twitter.  It was here the I first connected with Cheryl Morris and Andrew Thomasson who were also lurking online. Discovering we have similar educational mindsets, they connected me to the #flipclass chat.  Having found the #flipclass chat, I discovered #Flipcon and attended virtually in 2013 which then led to attending in person at #Flipcon14 and #Flipcon15.  The #flipclass chat also connected me and many others to Jason Bretzmann who crowdsourced us as contributing authors for the book Flipping 2.0.  Say what?! Yup, thanks to a Twitter chat, I'm a published author.

When I attended #Flipcon14, I had a list of people I "knew" through Twitter and #flipclass who I couldn't wait to meet in person.  The experience is akin to online dating:  connect online, then meet in person.  At #Flipcon14, there was no awkwardness or trepidation because, unlike folks who may misrepresent themselves on online dating sites, who we are online is who we are in person.  There was and still is no need to misrepresent ourselves online. Meeting Shai, Carla, and Lindsay for the first time face to face at #Flipcon15 was not an awkward experience because we already connected throughout the year via the #flipclass chat.


As Crystal Kirch and others stated, attending #Flipcon is like attending a family reunion. And while I want to form new connections with new attendees I have never connected with before, I am just so thrilled to see face to face the online folks who I've already "met" and who "get me" and understand me.


Keep in mind, my connections have grown with conference I attend. So in my first iteration of attending #Flipcon13 virtually, I really only knew Cheryl and Andrew, but at #Flipcon14 I connected with more people, and at #Flipcon15, I connected with even more people as evident by all the selfies I took (see all the pictures here).  My connections have grown exponentially each year. Also, the connections I've made have encouraged me to not only attend conferences but also to present at them. I'm no longer a passive attendee, but an active participant. My confidence and comfort level has increased the more I've interacted.

I've also learned not take for granted the connections at home.  In 2012, I happened upon a tweet sent by Kyle Calderwood who was calling for proposals for #TeachMeetNJ.  So ecstatic that there was a local conference, I signed up to present and started talking to him via Twitter. 
When I read the above tweet, I thought, "Oh! She must be reading my blog!" How else would this wife of a guy from Twitter know that I do "amazing stuff" with my students?!  Well, I started poking around through Twitter profiles and realized, (insert Homer Simpson "duh-oh!"), that Kyle's wife TEACHES IN MY DISTRICT.  Talk about slap to the forehead and lesson in humility.

Long story short, Liz and I threw together a session at the 2012 TeachMeetNJ on Edmodo and it went so well that we continued to present together at local edcamps and decided to submit a proposal to present at Edmodocon in the summer of 2013. Presenting at Edmodocon 2013 connected us to Edmodo staff who then encouraged us to submit our session, "Classroom Gymnastics: Using Edmodo to Flip and Blend your Class," to present at ISTE 2014 in Atlanta.

Presenting at ISTE 2014 was not an overwhelming experience because I had Liz and Kyle showing me the ropes of attending a big conference.  We carved out our niches in the vast ISTE landscape as the folks we knew from Twitter met up in Blogger's Cafe and the New Attendee Lounge areas.  If it weren't for my conference buddy, Liz Calderwood, and the #eduawesome folks of Twitter, ISTE 2014 would not have been such an amazing experience that influenced me to present at ISTE 2015.

It is also through Twitter that I connected with the indomitable Barry Saide who, long story short, crowdsourced a bunch of New Jersey educators to create the NJPAECET2 convening in September 2014 and later invited us to the national ECET2 convening in New Orleans in October 2014. It was Barry's ability to see our strengths and talents and bring together the group to connect us to the greater ECET2 network.  We are in the final stages of planning the 2015 NJPAECET2 convening to get other local educators connected.  Because Barry paid it forward to me to attend ECET2 in 2014, I paid it forward to my colleague Kim who I knew needed to be elevated and celebrated and nominated her to attend the 2015 ECET2 convening in Seattle.  Whereas I knew people prior to attending, Kim did not and was new to Twitter. So while she was in Seattle and I was on the road at #Flipcon15, I texted and tweeted her with missions to go find specific Twitter people who I knew were also at ECET2.


The point I'm trying to make is that I primarily use conferences to solidify and strengthen relationships. I do connect with new folks, but most of those new connections are because the new person is connected to someone I already know from Twitter.  So my advice, get connected before ever setting foot on site at a conference.

To recap how I make large conferences feel small:

  1. Get on Twitter and find folks who help you grow as an educator. Through them you will make new connections.
  2. Find a conference buddy who has attended the event previously and either travel together or plan to meet up.
  3. Follow the conference hashtag, follow folks who are tweeting, start an online conversation, then find out where folks are meeting up face to face. If your Twitter handle is written on your badge, folks will realize who you are from Twitter and you won't need to break the ice face to face ("Oh, YOU'RE  @____, I follow you!"). 
  4. Keep tweeting and keep attending conferences to expand your circles of friends.
  5. Find ways to pay it forward and bring new folks into the fold.


And as a final note, if you are wondering how to take the first step, click on all the hyperlinks to people's Twitter profiles in this post to expand your PLN and consider the words of Saint Augustine below...


Wednesday, July 8, 2015

#ISTE2015 Peer Evaluation & a BAM Radio Interview

So, this happened.....  Jon Bergmann, flipclass pioneer, interviewed me about my peer evaluation techniques at ISTE.

How did that happen???  Well, after chatting about what I do during lunch with Jon Bergmann, Aaron Sams, and Crystal Kirch, Jon says, "I need to interview you right now for my radio show!"  Say, what?!  I didn't even have time to process his statement.  Next thing I know, Jon finds a quiet spot, whips out his phone and starts recording and asking me questions. You can listen to the podcast of the interview with Jon Bergmann here.

That was on Sunday. On Tuesday, I presented my ISTE session, "Best Practices & Digital Tools for Feedback, Assessment, & Evaluation," to a packed room. No open seats and folks were even sitting on the floor!


To learn how/why I got started with peer evaluation, read this.


Since my student teaching days, I've been refining my peer evaluation process, and with Google Apps for Education, the process has become paperless. Google Classroom makes it easy to manage the workflow. Keep in mind, the following steps take place over the course of a week or so. Students get their writing evaluated by classmates, and then the writers evaluate their evaluators. The objectives of this process are centered on fostering a community of writers and having a dialogue about student work. Students are engaging in an analytical, reflective, and metacognitive process.


GOOGLE CLASSROOM STEPS:
  1. Create an assignment in Google Classroom for students to turn in their writing.
  2. Create a Google Form for the peer evaluation.  I use a combination of rubrics: checklist of requirements, numerical qualities, and Outstanding/Satisfactory/Unsatisfactory (OSU) to assess quality. 
  3. Share the writing pieces with the class. Classroom will automatically put all student work in to an assignment folder which you can share with the class. I prefer to set the permissions to "Anyone with link can COMMENT." When you change the folder settings, it will change every document in the folder to match the sharing permissions of the folder. 
  4. Create an announcement where you provide the link to the shared folder and the Google Form for evaluation. Students open folder, select essays to read and evaluate on the Google Form. I encourage students to do at least 5 different evaluations. 
  5. Create another Classroom assignment for analyzing the evaluations. I create a template Google Doc with guiding questions and have Classroom create a copy for each student and I attach the master spreadsheet for the students to copy/paste their particular data. Students analyze their data and agree/disagree with the itemized evaluations as well as the whole evaluation. They must provide evidence to support their agreement/disagreement with the evaluations. 
  6. Create another Google Form for the Evaluation of the Evaluator.  Writers will fill out the form providing their evaluator with feedback on the quality of the evaluation. I've also used the Autocrat add-on to auto deliver the feedback to a Google Doc for each evaluator instead of doing the next step. 
  7. Create another Classroom assignment for analyzing the evaluation of the evaluator with another Google Doc template (again set it so Classroom generates a copy for each student to edit) and the link to the spreadsheet attached. Students copy/paste their corresponding data on to their Google Doc and analyze/reflect on how well they evaluated their classmates.

Throughout this entire process, I am monitoring the students and checking the spreadsheets.  If I see something out of joint (someone isn't pulling his/her weight), I will speak directly to the student and provide redirection.  Students are also allowed to talk to one another while working on the evaluations. I keep an ear on the conversations and will jump in as needed.


So I know this process is an overwhelming amount to digest at once.  I do not do all of this right away.  I scaffold the process and gradually ease students into this. Here is my instructional design:

Marking period 1: Foster an open community by getting students accustomed to sharing their work.  Everything from worksheets to quick writes is shared with a neighbor.  I also have students post their finished work to our Share Our Work small group and Scribe City group in Edmodo (more on the Edmodo groups in another blog post).  We do quick peer evaluation activities on paper to start and by the end of the marking period use Google Forms. We have discussions on how to evaluate each other's work with students writing self-evaluations. No formal evaluations of the evaluator just yet.

Marking period 2: We maintain our open community, but the writing tasks and peer evaluations have increased in complexity and length. We no longer use paper to evaluate, everything is on Google forms.  Students still complete self-evaluations and begin to use Google Forms to evaluate the evaluator.

Marking period 3: Pull it all together!  Students engage in the entire process completing formal evaluations of writing tasks and the evaluators. Everything is on Google Forms and in Classroom.

Marking period 4: Continue. Continue. Continue.  As a final project, students write up a final self-reflection as a writer and evaluator examining their growth through out the entire year.


So that is it in a nutshell.  Did I lose you through all of this?  Need clarification?  PLEASE, share and let me know what you do with your students.  I am continually tweaking this process, so I value your contributions!