Showing posts with label #fln. Show all posts

Thursday, March 21, 2019

Screencasting: Pick the Right Tool for the Job

Screencasting is an integral part of my flipped classroom as I can record videos for a variety of purposes that include (but certainly not limited to) informing parents and students about class expectations, providing answer key videos, documenting directions and the steps of a project, and informing support staff of technical glitches, but I recognize that I am not a Hollywood cinematographer. So, the screencasting tool I choose depends on the type and length of video I need to create.

Screencastify

Screencastify is a Chrome extension that I use for quick recording of videos that are saved to my Google Drive or uploaded to YouTube. As editing capabilites are limited in the free version, I record quick, raw videos on the fly with Screencastify. If I need to quickly record the steps for using a specific edtech tool or need to record a quick video documenting a technical glitch, I will use Screencastify and share the Google Drive link to the video in an email, Edmodo post, or support help ticket. While I can upload Screencastify videos to YouTube, it is quicker and easier to just send the videos to Drive for fast distribution.

For screencasting with students who use G Suite for Education and for schools that block YouTube, Screencastify is the easiest edtech tool for students to use to create their own screencasts as the video can remain in the walled garden space of Google Drive and shared with those who need access. Videos can be embedded in Google Slides or the links turned in to assignments for quick assessments.


Screencast-O-matic

I love Screencast-O-matic for making longer demonstrations or informational videos that are under 15 minutes. To mitigate the need for post-production editing, I will have open on my desktop or browser all materials I plan on recording.  Every video will begin with a title slide and a short introduction ("Hi, this is Mrs. Baker and today I will show you..."), and as I record, I will hit the pause button and switch tabs as needed. The video may conclude with a closing slide or a simple statement, "Thanks for watching! Please contact me if you have additional questions." Videos are uploaded to YouTube and later pulled into Edpuzzle, Actively Learn, or posted in Edmodo and Google Classroom. 


Camtasia

If you are serious about video production and need advanced editing tools, then Camtasia is worth the $$$ investment, but be ware, videographers, that post-production editing can take up more time than the actual filming. There are some great flipping educators out there who can quickly whip up a screencast with cool transitions and special effects, but I haven't built up that level of proficiency with using Camtasia.


Interesting in Learning More?

Recognizing that we do not have Hollywood's budget nor the equipment to create a blockbuster screencast, I created this self-paced lesson embedded below which is modeled off of the Explore-Flip-Apply instructional method of Flipped Learning. Navigate through the slides, examine the examples provided, accesss the resources, and take a spin at creating your own. If you send me your creation, I'll add it to examples provided.


Sunday, March 10, 2019

Teaching (Digital) Literacy: Driving Students to the Intersection of Reading, Writing, & Discussion

Part of my job as an English teacher is to teach students how to read, analyze, talk, and write about texts in both paper-based and digital formats. According to the American Psychological Association (APA) in article published in August of 2018, "In recent years, less than 20 percent of U.S. teens report reading a book, magazine or newspaper daily for pleasure, while more than 80 percent say they use social media every day." Furthermore, “Compared with previous generations, teens in the 2010s spent more time online and less time with traditional media, such as books, magazines and television,” said lead author Jean M. Twenge, PhD, author of the book iGen and professor of psychology at San Diego State University, “Time on digital media has displaced time once spent enjoying a book or watching TV.” While students are reading plenty of digital texts, I wonder how well they are able to analyze, talk, and write about them.  By integrating such edtech tools as Edpuzzle, Formative, Actively Learn, and the G Suite for Education in to teaching practices, we can drive students to the intersection of reading, writing, and discussion so that they can practice skills that they can use both in and out of the classroom.

I had the opportunity to collaborate with the venerable and uber-intelligent Natalie S., the senior researcher from Actively Learn on a workshop session that we gave at CUE and NCTE-CEL in 2017. The above linked article from APA reinforces the importance of teaching digital literacy skills to my students. We cannot assume that student are proficient digital natives.  The activities showcased in the slides provide teachers with lesson examples that cover a range of assignments:

  • Quick, Do Now annotation of an image with Formative
  • Flipped Learning style audiobooks that include checks for understanding with Edpuzzle
  • Daily reading lessons that include checks for understanding and opportunities for annotation and digital discussion with Actively Learn
  • Extended writing tasks that integrate annotated texts with Google Docs


Check out our slides and learn how you, too, can drive learners to the intersection of reading, writing, and discussion.


Sunday, March 3, 2019

Quick, Paperless Lesson Planning with Google Calendar and Sites

I integrate technology into my personal and professional practices so that I can save time and function efficiently. For many teachers, lesson planning can be time consuming and cumbersome as they write, execute, and send the plans to administration. Utilizing Google Calendar and a class Google Site as part of G Suite for Education, lesson planning can be quick and efficient. And, as everything is curated online, I do not need to print out reams of paper when submitting my plans to administration or keeping parents and students informed of events in class.


Quick Steps:

1. Create a calendar for each prep taught.
2. Create an all-day event for the lesson plan of the day.
3. In the description area of the event, type in the plan and links for the day.
4. Set the calendar to public and share with appropriate administrators.
5. Create a Google Site with pages for each prep taught and embed the calendars.
6. Share links to the Google Site as needed.


Calendar Organization & Settings


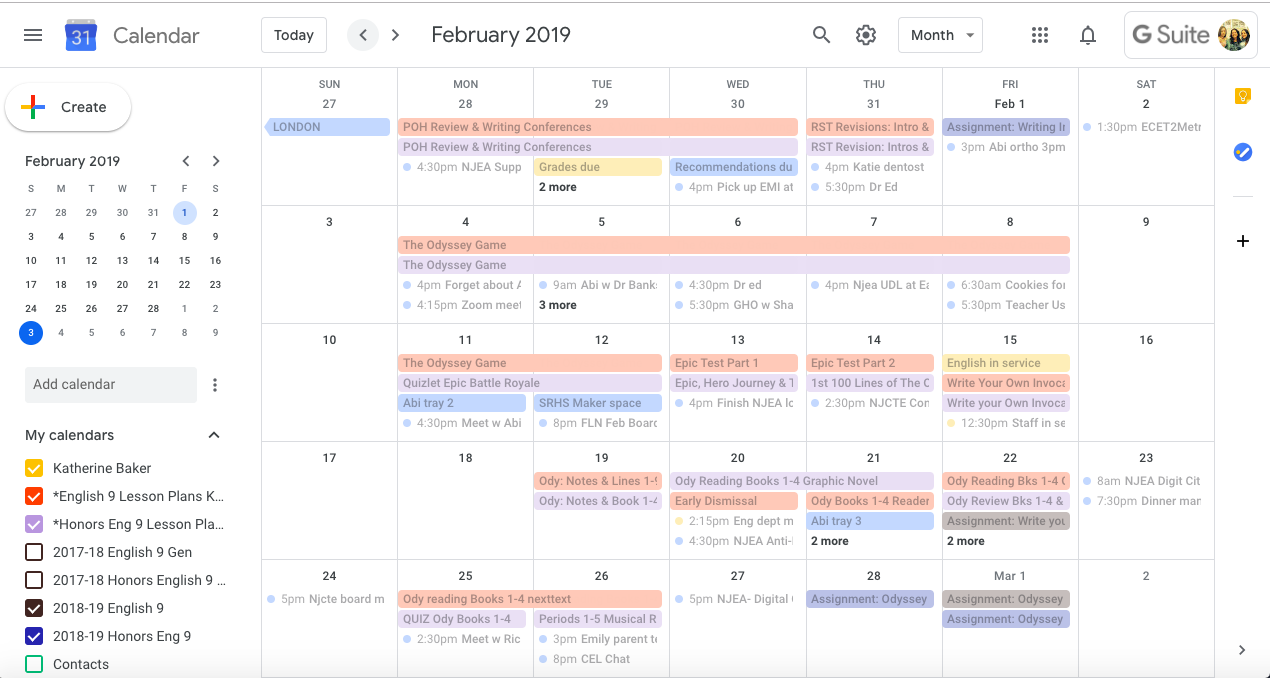
The longevity of Google Calendar makes it an ideal platform for paperless lesson planning. I have been writing my lesson plans in Google Calendar since September of 2013 and can easily access a specific day, month, or year with a few clicks. I do not organize and name my calendars by period as my schedule from year to year may differ. Nor do I need multiple calendars for the same level or prep, as I will have the same plan for each. Instead, I name and color code my calendars by the title or level of the class and use the same calendar every year I am teaching that prep. I can compare previous years' plans to the current school year, as well as copy/paste/edit descriptions of plans I reuse.

Here is a quick screenshot of my English 9 February 2018 and 2019 calendars. I can see that last year, I did not begin my Odyssey unit the end of the month, whereas this year, I am ahead of last year's pacing.


Writing the Plans


The day on which an event takes place is much more important the time it takes place. For each day I write plan, I create an all-day event. The time of event is irrelevant. I do not need my plans to be posted to a specific time because I am following the same teaching schedule every day, and it would be a waste of my time and energy to post the same plan for multiple times on a given a day since I am teaching the same plan for each class/prep period.


In the title area of the event, I will state what topic we are covering that day and be sure to select the appropriate calendar for that prep/class.  In the description area, I will type out an outline of the plan and include any links to resources. I keep the structure of the plan consistent with four main areas: Objectives, Tasks, Assessments, and Standards.


I can easily copy/paste the description and post it as a note in my Edmodo groups or Google Classroom (or other learning management site) for students to access at home. By posting it to my LMS groups, students can access any attachments and ask follow-up questions if needed. While I can add attachments to the event, I prefer to post the attachments in Edmodo for students to access as the Calendar is more of a static landing page to see classroom events and not an arena for discussion.


Publicizing the Calendar


In the settings of each lesson plan calendar, set the calendar to PUBLIC. This will make it visible when you embed it in a Google Site that will be visible by students, parents, and administration.

The new and updated version of Google Sites is ridiculously easy to create a class web page with an embedded calendar: create the site with a page for each class/prep taught, and from the Insert menu in the Site editor, simply click CALENDAR to embed a calendar on that page. Be sure to hit PUBLISH so that your site goes live!


I provide the link to the class Google Site to parents at Back to School Night as well as demonstrate how they can see the day to day plans by clicking on the event for that day. I also email the link to the Google Site to my administration when I am submitting lesson plans rather than printing out pages of plans.


Recap


Lesson planning with Google Calendar and Sites is an efficient and quick way to track and publicize your day to day teaching from year to year for students, parents, and administration.

Sunday, December 9, 2018

Groupwork Protocols for Blended & Flipped Learning

I am inspired by Catlin Tucker and her Station Rotation model, but in a 43-minute period, I struggle with how to effectively implement the rotation piece with my ninth grade students. Every second in our 43-minute period is precious. No matter how well I train my students, the transition time for station rotation is problematic. So I thought, "What if the stations rotate to the students?" And with that, my Group Agenda Protocol was born!


Protocols & Procedures


This protocol for a class routine is designed to promote student accountability and efficacy, shifting the role of the teacher from the “sage on the stage” who is tethered to the front board to the “architect of learning” who creates structure for learning to occur and the “guide on the side” who facilitates student learning by circulating through the room as students work. While similar in design to a station-based model, students do not move from their seats, but rather complete tasks listed on the agenda in a set amount of time.


Set-up Quick Steps:
  1. Set up the room. 
  2. Determine the agenda and copy/paste the chosen agenda format to a new document and fill in with appropriate information. 
  3. Print agendas and organize materials for each group. 

The teacher sets up the room to create four groups of six students for a 24-student class or five groups of six in a 30-student class. Students may choose their group or the teacher may assign students to a group.

Each table configuration is identified by a number, taping a sign to the wall near the group. The agenda and group roles are printed and placed in a basket or bin on each table. Materials needed for the class period are also placed in the bin/basket.

The group roles are designed to maximize student accountability and to allow for every student to participate within a group of 6 students. If there are fewer or more than 6 students in a group, they can double up on responsibilities/roles.


The Group Agendas

There are three versions of agendas that can be customized as needed with specific directions, links, and tasks. To add additional tasks to the agendas below, simply insert a new row into the table for v.1 or a new column (then merge cells to get rid of extra spaces) in the task area for v.2 and v.3 agendas. It is recommended that you keep an ongoing document on which you compile the agenda for each day. This document can be shared with students and administrators. To see an example of a month’s worth of agendas following v.1 format click here, and to see examples of v.2 and v.3, click here.

Agenda v.1 is designed with all groups completing the same tasks at the same time in a 43 minute period. Think of this as a common playlist of tasks. The class period begins with a Do Now, bell-ringer activity, then progresses through three tasks, and concludes with an exit ticket. During the class period, the teacher circulates through the room, helping students and groups as needed.

The number of tasks can be increased when following Agenda v.1, but be mindful of the decrease in time for each additional task. One way to manage tasks is to break up a big assignment or a worksheet into smaller chunks. For example, a four page packet of activities could be separated into four tasks, one page per task. This will allow students to practice pacing and makes a large assignment seem less intimidating for struggling learners.

Agenda v.2 is designed with all groups completing tasks via a rotating schedule so that the teacher can meet with each group at a designated time to check work or give a mini-lesson to the group. The class period begins with a quick Do-Now and then progresses through 4 non-sequential tasks of equal duration. The 4 tasks are completed in 8 minutes each, but can be completed in any order. Each group rotates through tasks using the provided sequence listed on the agenda. The period concludes with a 3 minute Exit Ticket.

Agenda v.3 is designed with a rotating schedule of 3 non-sequential tasks of varying duration (2 short tasks, 1 longer task). The 2-1 duration tasks are completed in two 8 minute blocks and one 16 minute block. One of the 8 minute tasks is spent meeting with the teacher. Each group rotates through tasks using the provided sequence listed on the agenda. The period concludes with a 3 minute Exit Ticket.

When following v.2 and v.3 of this group protocol, it is recommended that the number of groups be kept at four so as to maximize the amount of time the teacher visits each group. Included with the agenda templates is a version of Agendas v.2 and v.3, designed for groups of 5. If the number of groups and tasks are increased to five, then the time for each task and the time the teacher has to meet with each group is decreased from 8 minutes to 6 minutes per in a 43 minute class period. This may affect the quality of the meeting with the group, the work students are completing and may impact the type of tasks they are directed to complete in such a short time.

All Do Nows and Exit Tickets should be recorded in a student’s notebook, serving as an ongoing record of activity. The class tasks can be completed in the students’ notebooks or on teacher-provided handouts or digital files as appropriate.

To minimize the time spent by the teacher accounting for student completion of work, the Quality Controller should be recording the progress of each group member throughout the period on the provided chart located under the agenda, noting the completion of each task by each group member. Rather than collecting all papers for each group member and handing the papers to the teacher, students should keep evidence of the task completion in their notebook, which can be produced upon request.

At the end of the period, the Agenda page is turned in to the teacher. The Agenda is kept on file as documentation of student participation and behavior. The teacher can award participation points to each student based on the number of tasks completed. For example, if Biff Bifferson only completed 3 out of 5 tasks, a grade of 3 out of 5 can be recorded in the gradebook for that day’s participation. The teacher can follow up with each student and verify the authenticity and accuracy of the completion of work in a quick and efficient manner. If the student makes up the INC assignments, the teacher can easily update the gradebook.

Folks who attended FlipTech East Coast and Rewire conferences got to experience the Group Agenda Protocol first hand. Below are the slides for the session.

The Group Agenda Protocol is a method for maximizing the precious time we have in class and for promoting student efficacy and autonomy in a structured learning environment.




Sunday, September 3, 2017

Digital Dashboard Document

This year I am trying a more transparent and strategic approach to my technology integration.  I've always been mindful of the purpose of the tool, but I wonder if I've consistently conveyed that purpose to my students and colleagues.  I have a plan. I know what I'm doing, but do others see it?

So, to get things started, I created a Digital Dashboard Google Document on which my students will see what sites we will be using consistently, the rationale for using that site, and an area in which they will type in login information---not their actual password, but hints or clues in case they forget. There are important class links to district sites, as well as extra rows for students to add additional sites they may choose to frequent.

Both Edmodo and Google Classroom give users the ability to generate an editable copy for each student with the file name and sharing permissions, so in the event that someone does not remember his/her password, the student can access the doc or I can offer clues.  Many of the tools we will employ in class allow the teacher to reset passwords, but I want students to be responsible for their accounts before I access my dashboard.

If you like this design, go ahead and snag a copy, customizing it for your students. In the comments for this blog post, please share how you convey the purpose of technology integration to your staff and students.


Saturday, September 2, 2017

How to Flip Back to School Night

In a previous post I shared about the results of flipping Back to School Night. Today, I'm going to show you step by step how I used blended learning to achieve those results.

The first few days of school:  (Nothing crazy here)  Have your Class Expectations typed up on either a Gdoc or Word document, photocopied and distributed to the students.  I also include an area on the document for student and parent signatures.  Give your students a few days to obtain the parent signatures.

I do not read the expectations document to the students in class because all teachers in all other classes are doing the same thing and my expectations will get lost in the shuffle.  I do tell the students that they are to read the document carefully before signing.

So what do students do instead of passively sitting listing to me drone on about the course expectations? We are jumping right in to learning activities: icebreakers, group work, problem solving,  etc.  For the 2017-18 school year, I'm going to start with an editable Escape Room / Break Out activity created by Nouvelle ELA. I don't normally purchase items from Teachers Pay Teachers, but not being experienced in creating my own breakouts yet, I thought this was a worthy investment, and at less than $6, a real deal!

Recording & Delivering the Video:
There are a few simple steps for recording your video and making it interactive for parents and students.

  1. Prepare your recording space by adjusting the lightning, background props, and alerting others that you don't want to be interrupted. Since you are providing an overview of your course, it is important to record your video in your classroom space. I put a sign on the door stating that I'm recording and do not want to be disturbed. 
  2. Create a title slide for your video using Google Slides or PowerPoint. Keep it open on your desktop.
  3. Have open your Course Expectations document.
  4. Open Screencastomatic or Camtasia, and select recording a portion of your screen and have the picture in picture on. You want folks to see and hear you. So don't be camera shy! You will size the frame so that it captures the slide first. Tip: you don't need to put your slide in present mode, simply have the recording frame capture the area of the slide.   
  5. Record a quick introduction stating your name and the course. Hit PAUSE on the recording. 
  6. Switch to your course expectations document, resize the recording frame, and hit record.
  7. As you talk through the expectations, you will slowly scroll through the document. Try not to read from the document verbatim, and do not ramble!  This video must be kept under 15 minutes. 
  8. If you plan on importing the video into EDpuzzle or another interactive video tool, strategically pause after important moments so that you will have spaces to insert the questions which will check for understanding while watching the video.
  9. After you have finished talking through your course expectations, pause the recording, switch back to the title slide or create a slide that includes your contact information, resize the recording frame, and record a brief closing message. This will give your video a more polished feel by capping the ends with an opening and closing slide.
  10. Create a handout of questions to accompany the video. If using an interactive video tools such as EDpuzzle, insert the questions to check for understanding. 
  11. At least two weeks prior to Back to School Night, assign the video lesson as homework, the student and parent must watch it together! The two week time frame allows parents to work around their schedules.
  12. So as to prevent tech issues from occurring, provide multiple avenues with which parents and students can access the video and reinforce that all answers are to be written on the question handout page. No matter the hardware, EDpuzzle allows for folks to view either by signing in to their account or through Guest Mode, so parents can experience the tool along side their student, but you don't have to worry about the student not completing the assignment if they have trouble logging in to their account at home. 
  13. As students turn in the questions page, review the responses and make note of any patterns: if many got the same question incorrect, then you need to address the issue on Back to School Night and follow up with the parent individually in an email.


After the Video: Following up with parents after the video is important for community building and creating an open dialogue with parents.  All parents should be sent an email thanking them for their completion of this task and inviting them to Back to School Night.

If your Back to School Night is anything like mine (9 minutes per class with 5 minutes between each), it is impossible to do a deep dive and convey all of the information about your course to parents. Also, due to work schedules and such, not all parents attend Back to School Night, so rather than thinking of this event in terms of information delivery, focus on how to let the parents in the room experience your class with a short learning activity. Let the video be the information delivery mechanism, as you can ensure all parents and students take the time to view it and answer the corresponding questions.


Thursday, December 15, 2016

Digital Portfolios with Google Tools

I realized that I was over complicating matters and making things too complex when it came to creating digital portfolios with my 9th grade ELA students. I am passionate about technology integration in my class, but I am mindful of how/why we use the technology. As I flip the learning in my class, it is easy to get inundated with the myriad of edtech tools and sites that are available. So, keeping things very simple, and sticking with what we know, I decided to capitalize on the power of Google Docs and hyperlinks to create digital portfolios with my students.

The portfolio is one Google Doc on which the student will list and link to each of the writing pieces, as well as write a brief reflection of what was learned about the process of writing.

The Quick Steps:

  1. In Google Docs, create a template hyperdoc of the portfolio.
  2. In Google Slides, create a slide deck that walks students through the set-up process.
  3. In Google Classroom create an assignment and attach the slide deck ("anyone can view") and template doc ("generate an editable copy for each student"). 
  4. Allocate time in class for students to work on the portfolio. 
  5. Score the portfolio each marking period.

The Template

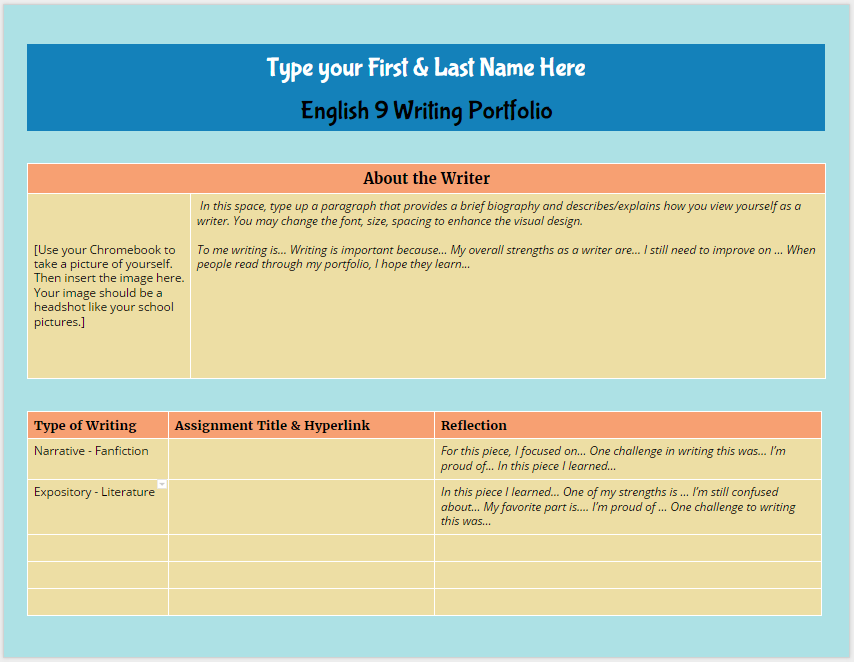
If you haven't picked up a copy of The Hyperdoc Handbook, you better do so NOW. Author Lisa Highfill and all share strategies for creating Google Docs with an enhanced visual design.  The template I created for the portfolio is organized by inserting tables to create title areas and lists of assignments. Also, I changed the background color of the page and the fill color of each table section. By changing the visual design from the usual white Google Doc, I am influencing students' initial reaction to the doc: because the portfolio doc looks differently than the other docs they've seen, they will react to it differently.

Students are allowed to personalize the doc and change the fonts and colors, but I want to make sure that they have a consistent theme to their visual design.  Color palette generator such as Coolors  and other activities that teach students about visual design facilitate the process.

Open the doc and go to FILE, MAKE A COPY to create
your own editable version of my template.


The sections of the portfolio doc include a heading area for the student's name, an about the Author section, and a list of the assignments that include a label for the type of writing, the assignment title and link to the student's writing piece, and an area for reflection on the specifics of the writing task. The most important area is the reflection. If I want students to act like authors, then I need them to think about the intention of their writing and reflection on the process of creation. 


Setting Up the Portfolio

To lead students through the set up process in a flipped instructional manner, I created this slide deck that walks students through the process.


You'll notice that I also included the rubric for scoring the portfolio with in the slide deck. More on scoring later in this post.


Google Classroom Assignment

If you aren't using Google Classroom yet for your Google Docs workflow with students, you are missing out! Google Classroom makes managing student docs so much easier.  For each assignment I create, I can attach resources and templates. Each attachment can be set to view only or editable by all, or I can have Google generate an individual copy for each student that has the file name and sharing permissions automatically created. No more untitled docs!

For the Digital Writing Portfolio Assignment in Google Classroom, I attached the slide deck (set to view only) and had Google generate an editable copy of the portfolio doc for each individual student.  All docs created are housed in the folder for this assignment in my Classroom folder in my Google Drive. 


As we finished up individual writing pieces, I allocated class time so that students could add the latest assignment. The beauty of using hyperlinks for each assignment is that my students are not just limited in creating Google docs of their assignments: anything that they create that is housed on the web can be linked to their digital portfolio doc.

Scoring the Portfolios

At the end of each marking period, I give students time to finalize their digital portfolio. In Google Classroom, the students click DONE to submit their assignment, thus removing editing privileges on the doc. I score the portfolio with the rubric below using the Doctopus and Goobric add-on in Google Sheets. After all portfolio docs are scored, I return the files to the students. At the end of the next marking period, they revise the portfolio doc and hit DONE on the same assignment I first created-- no need to create a new assignment for each marking period! 

Philosophically, I am against putting grades on writing, but working within a system that mandates grades on assignments, I focus on providing feedback and ample opportunity to revise assignments until the student (and I) feel that the piece has met the objectives while also finding a way to get a numeric grade on the assignment. 


If you notice, the rubric adds up to 100 points, but the columns for scoring are equivalent to a specific percentage and letter grade that aligns with the grade breakdown of my district:

A = 100-92
B = 91-83
C = 82-75
D = 74-70
F =  69-0

20/20 = A
18/20 = B
15/20 = C
12/20 = F

I do not give half scores or use other numbers for each column listed above. The numbers are the numbers, but you will see a greater range of scores when you look at the permutations of the possible rubric scores and what score shows mastery versus lacks proficiency.


Rubric design and scoring will have to be saved for another post. But, if you look at the permutations above, because I made set each column score to a specific number that aligns on the 100 percent/point scale, I've allowed for more possible passing scores than failing scores. As Rick Wormeli will tell you, the 100 point scale (especially in my district with 100-70 as passing) puts way too much emphasis on failing grades. My scoring flips this dynamic and puts the emphasis on the upper range.


BUT, the whole purpose of the digital writing portfolio is to de-emphasize grades and focus on publishing student work in a manner that is organized, reflective, and on-going, and using Google Docs as the housing system of students assignments is a method that is simple and sustainable. I don't have to worry about a special website or an app closing down in a few years, and students can easily replicate this process after high school graduation with their own personal Google Doc accounts to create portfolios for college and career.